Yammerhead
VIP Member
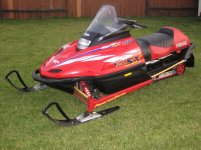
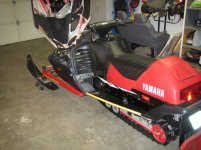
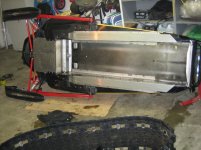
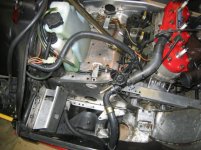
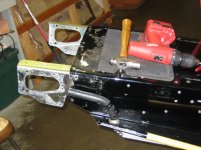
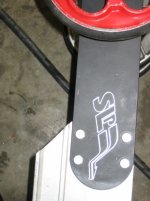
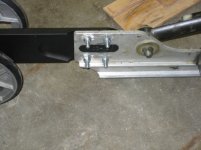
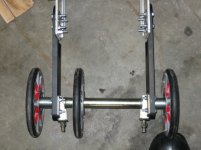
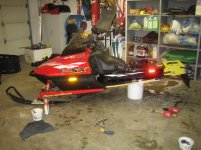
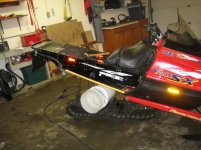
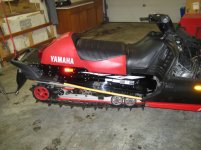
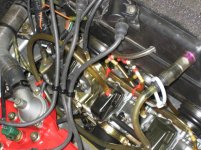
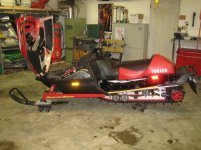
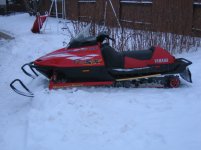
Pulled the old girl out of the shed this fall thinking I was just going to do my usual pre season carb cleaning and general inspection. Then I thought that I hadn’t checked the skid for a couple of years so I pulled it and changed all the bearings. Then I thought I should change the driveshaft bearings as well and that lead to doing the same with the chaincase and jack shaft. I also had been collecting parts for a few years to go 136” with it. I figured, what the heck, might as well do the extension. So, I had to find a track. Searched around on the net and found a take-off 136”x 2” at CR Racing in Kelowna for a good price. Well, now I needed 8 tooth drivers to fit the track. Bought a set off TurboTony from the 4 stroke side and had a local guy press them on for me. Then I found a set of SLP rail extensions at my local sled parts store. The inserts fit nice and tight into the original axle slot, so I think they should hold up well. I’m not sure about the black finish though. We will see how it looks after a couple of years. So, I started looking at the tunnel extension I had laying around and realize I need the tunnel braces. ModMMax gave me a set off of and old tunnel of his. Great guy. At this point I put the tunnel extension on and realized I would have to use the 136” coolers I had in order to make the bumper cover work properly. More drilling and riveting! I also didn’t take the time to send the tunnel extension to be powder coated and am regretting it now because it scratches really easy.  Oh well. I also wanted to try a Tempa Flow out. I ended up buying one from ekimsx600. I changed the jetting back to stock and installed the Tempa Flow. Put the rest of it back together and she fired right up. Now I am just waiting for some more snow to fine tune the Tempa Flow and play with the suspension.
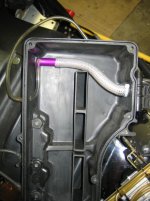
I did a lot of reading on this site and had lots of help from members. Would have been way harder to do this without this place. Thanks guys!

!")
Oh well. I also wanted to try a Tempa Flow out. I ended up buying one from ekimsx600. I changed the jetting back to stock and installed the Tempa Flow. Put the rest of it back together and she fired right up. Now I am just waiting for some more snow to fine tune the Tempa Flow and play with the suspension. I did a lot of reading on this site and had lots of help from members. Would have been way harder to do this without this place. Thanks guys!
Attachments

Yammerhead
VIP Member
Yammerhead
VIP Member
Yammerhead
VIP Member
ViperXC
New member
If you updated to new wheels on the suspension it would look like a brand new sled, good job!


Hey it looks really sweet. One thing I noticed is the hose from the tempa flow to the carb. It needs to be around 24 inches long for the Tempa Flow to work right. That short hose will make it read lean. Makes me miss my old red head. Maxdlx
Yammerhead
VIP Member
maxdlx said:Hey it looks really sweet. One thing I noticed is the hose from the tempa flow to the carb. It needs to be around 24 inches long for the Tempa Flow to work right. That short hose will make it read lean. Makes me miss my old red head. Maxdlx
Yeah, I read that in the instructions. I measured it and it is actually 27 inches right now. It kinda loops around and looks deceivingly short in the picture
.
sxviper32
New member
you said your powdercoating scratches really easily? that shouldn't be right. powdercoating, if done properly, is more durable than paint and should not scratch or chip easily at all. i'd look into that. looks nice by the way!!!
Nice Ride.........Really A 1 Of A Kind.....SWEET 
mountainman
New member
looks good but get a riser and drop the skid down a few inches ... looks wierd like it is.. sits to low
ModMMax
New member
Looks like it turned out just fine. Nice work.
vmax-sx
New member
Hey Yammerhead very nice! but how were you able to get enough clearance for the 2" track? thxxx
Yammerhead
VIP Member
The 2 inch track will just fit with 8 tooth drivers. The stock ones are 9 tooth.
03viperguy
Moderator
looks great! I like the low slung look. will handle great that way as well