jwiedmayer
New member
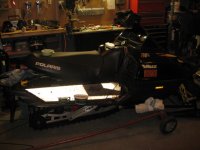
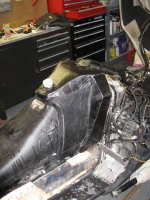
Well, I went a little different route then most to raise the seat on the old vmax. Now I need to make some fiberglass parts to fill in the gaps. Any suggestions on what to use for the plug? I was thinking foam or clay. The foam might get ate by the fiberglass and I'm not sure how you could get the clay out of after curing the fiber glass.
Attachments
SX_SLAYER
New member
Wow!
I'm not sure on your question... but WOOWWWWWWWW that tunnel is shiney!!!! nice work!
I'm not sure on your question... but WOOWWWWWWWW that tunnel is shiney!!!! nice work!
gbic1
New member
I would build 2 plywood upside down Us with flat plywood holding their shape. Pull it off, then cover it with cloth then fiberglass resin like the speaker guys do. What holds the back of the seat up. I was contemplating doing same thing with RX1 seat. Nice.
xsivhp
Active member
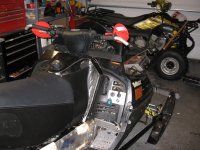
Maybe you need a polaris hood?
Sledsquatch
New member
- Joined
- Sep 29, 2008
- Messages
- 220
- Age
- 49
- Location
- Carleton Place, Ontario
- Website
- www.simplifiedaudiovideo.com
Tape all of the parts that you do not want to get fibreglass on. Bottom coat should be a masking tape, second coat is duct or tuck tape, this prevents any seepage.
Take fleece material and stretch it over the areas you need to glass, I would use 3M super 20 spray glue to adhere it to the tape.
Use your resin and brush it on to the fleece making sure it soaks through it.
Let it dry.
Once dry and the fleece is stiff you can now remove it and start adding fibreglass to the mold that you just made, add enough to make it strong for your purpose, if you need it to be stronger then one layer thick, then add glass strips in the back of it.
Add bondo to smooth it out
Paint it with a good sealer
Paint with a good finish paint
Attach to sled
This is how I build my fibreglass subwoofer enclosures and dashes for custom car projects. It is very light and strong.
bluewho
Active member
I would take a saw to a old van body or something allready built and cut a strip with the >cut into it on both sides bend it around 2 plywood (> inner suports and do your fiberglass work inside hidden under the seat.It will give you a nice clean finish.
You might be able to work with a corner or wall to roof moulding.Cut slits in the top to bend than glass. It would be less bondo work doing it the strip way but any type of wood jig would work as well covered over.
You might be able to work with a corner or wall to roof moulding.Cut slits in the top to bend than glass. It would be less bondo work doing it the strip way but any type of wood jig would work as well covered over.
jwiedmayer
New member
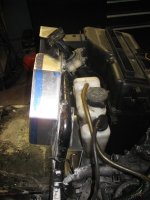
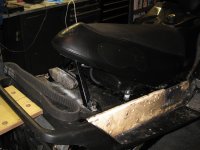
Its covered with black reflective sticker. Like the stickers on a boss mustang.
SX_SLAYER said:I'm not sure on your question... but WOOWWWWWWWW that tunnel is shiney!!!! nice work!
jwiedmayer
New member
This is pretty much what I have decided to do. Anybody every use aqua-resin? I need something that is not going to gas out the garage. I have little one and a sensitive old lady..
Sledsquatch said:Tape all of the parts that you do not want to get fibreglass on. Bottom coat should be a masking tape, second coat is duct or tuck tape, this prevents any seepage.
Take fleece material and stretch it over the areas you need to glass, I would use 3M super 20 spray glue to adhere it to the tape.
Use your resin and brush it on to the fleece making sure it soaks through it.
Let it dry.
Once dry and the fleece is stiff you can now remove it and start adding fibreglass to the mold that you just made, add enough to make it strong for your purpose, if you need it to be stronger then one layer thick, then add glass strips in the back of it.
Add bondo to smooth it out
Paint it with a good sealer
Paint with a good finish paint
Attach to sled
This is how I build my fibreglass subwoofer enclosures and dashes for custom car projects. It is very light and strong.
jwiedmayer
New member
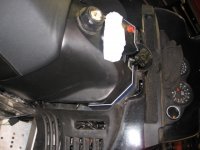
There is a strut that I have to buy yet. The polaris logo will be covered.
gbic1 said:I would build 2 plywood upside down Us with flat plywood holding their shape. Pull it off, then cover it with cloth then fiberglass resin like the speaker guys do. What holds the back of the seat up. I was contemplating doing same thing with RX1 seat. Nice.
jwiedmayer
New member

musselman
Active member
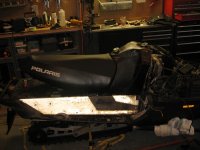
That's going to look really neat when it comes together. Remember to get rid of that polaris on your seat !") .
.
.jwiedmayer
New member
musselman
Active member
Wow that matches up really nice, well done .
.jwiedmayer
New member
I'm parting this sled out if anyone wants the tank, seat, and rest of the stuff to put the polaris seat on a Yami sled.