*99sRx700*
New member

auji700triple
New member
I like it Rc, Can you be able to do it to the viper??
TopGunnSrx
New member
Looks pretty cool how'd ya do it?
*99sRx700*
New member
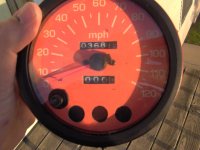
first, i heated it up with a hair dryer, got it pretty darn hot, could barelly hang onto the thing. Then i carefully pryed it apart with a small flat blade screw driver. Once apart, use a dinner fork to pull the needles off, but be careful, as the needles are fragile. Insert the dinner fork under the needle, and gently pry up. After you get the needles off, then undo the screws, and pull the gauge face out. I put it in my scanner, scanned it, then used photoshop to make my new gauge faces. It is on a piece of post card stock, witha thin piece of plastic on top so it wont bleed if it does happen to get wet, which it shouldnt, as the gauges are completelly sealed. Light transfers throught just fine also. Used the stock gauges for a backer, and looks nice. When time to put it all back together, use rtv silicone, put anice bead around the gauge itself, and fit the cover back on.
Last edited:
Those look great 99sRx700! !") I'm not sure how it would work at night, but dark blue text on white would be sweet looking.
I'm not sure how it would work at night, but dark blue text on white would be sweet looking.
I'm not sure how it would work at night, but dark blue text on white would be sweet looking.2001SRX=Fast
New member
WOW rc thos look amazing
*99sRx700*
New member
thanks tyler, and the rest. Do likeem if I must say so myself. Was thinking of doing blue, but decided to go with orange, as my dash is also orange.
auji700triple
New member
thats wat im depating on doing.. blue background with white test.. but i donno if i wanna screw shit over hahaha


Looks good, send us pics of it lit up.
billjd
New member
The best thing for removing the needles saftley is a plastic golf divot repair tool (made for repairing divots on the greens) instead of a fork.
Have you tried it at night yet? If so does it work OK.
Have you tried it at night yet? If so does it work OK.
*99sRx700*
New member
the light up alright, not the best, but i cant get any poics of em, camera batterys are dead, and i was using a 9 volt. The numbers are definatelly visible tho, can see how fast ur going for sure