yamaha98sx700
New member
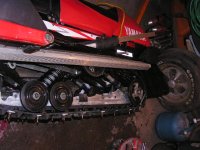
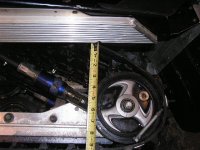
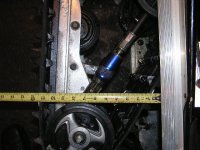
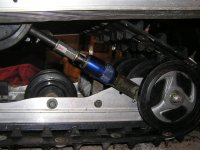
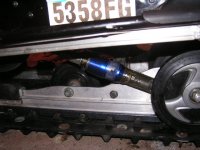
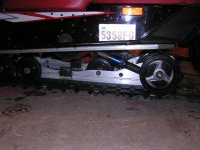
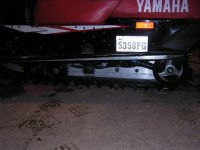
Hi Bethviper, These pictures show the Viper Suspension in my SX. I took the main spring out so I could check the travel.
The first one is the suspension collapsed, the second picture shows the suspension bottomed out the rear wheels don't even go into the tunnel, the third shows a measurement fully extended, fourth shows a measurement fully collapsed.
Please let me know what you think. Should I only be seeing about 2 inches of travel here? Shouldn't the rear wheels be inside the tunnel when fully collapsed?
Thanks for any help in this matter. I am starting to get a little frustrated, and would just like figure this out. I will get more pictures when I get it togather with my weight on it.
Attachments

Last edited:
gild
New member
Did you change any mount points? It looks like your coupler is holding your suspension up. When suspension is fully collapsed the track should be parallel to each, top and bottom.


Is the Center spring still in? The control rods will "couple" the suspension once the gap is used. The total gap is how far the suspension travels uncoupled, once the gap is used both springs are compressed together.
Remove both springs completely from the sled and try the same thing.
The arms will swing all the way down and actually hit the bumpers which you are a long way from doing in the pics.
Remove both springs completely from the sled and try the same thing.
The arms will swing all the way down and actually hit the bumpers which you are a long way from doing in the pics.
Last edited:
yamaha98sx700
New member
The center shock is still in. When I put it back together if I jump on the back bumper. it doesn't feel like it is going down all the way. It feels like it is closing the gap, and then stops, and then the front of the sled starts to lift. I don't think that any of the mounting points have been changed. There is no evidence. I don't see any additional mounting holes. The rear seams like it is sitting high, and when I set on the sled it doesn't settle very much. I can't get the back to settle enough to give me any gap on the rods. I am supposed to go out to tug hill Friday, and I am afraid that if something is wrong that I will bend or break something.
bluewho
Active member
I would take the top silver jam nut off and screw the bottom one back on the same way it is now.If you have a 1/4 inch plastic shim washer add it to fill the gap if you find it to large.You just tighton the nut very hard and it will stay put.
Last edited:
have you tried setting the suspension up as per my directions?
total gap
set up with limiters out till done
????
need more information.
total gap
set up with limiters out till done
????
need more information.
yamaha98sx700
New member
What do you mean by set the limiter straps out? I have them at 25mm from the bracket to the top of the stud. how far out do I let them? I have the , I think it was 16 to 18 mm gap as you instructed. I moved the fra to the soft setting and it still doesn't come off the bottom of the transfer rods when I sit on it. The top of the transfer rods are moved all the way up.
Here are some more pictures. I looks like the gap is opening on the bottom with the fra in the soft position. One is of the suspension totally collapsed. This is as far as it will go down. Does this look normal, or should I be able to collapse it all the way to the tunnel? When it get to this point it is lifting the front of the sled.
By the way. I didn't put the pliers to the transfer rod, I bought them that way.
Attachments
Last edited:
You've convinced me that something isn't right with that skid. I would pull it and check it all out. Take pics of the removed skid and post if you want us to diagnose further. At a minimum pull the shocks and verify that nothing is binding.
If BTV gave setup directions on this particular skid, they are probably very good ones to follow.
If BTV gave setup directions on this particular skid, they are probably very good ones to follow.
that skid should drop to the bumpers with you on it with no shock or even with just the front shock. you got something binding, bad shock, something in wrong.
yamaha98sx700
New member
With the back shock removed if you let the weight down on the back, it will drop right down. I was starting to think that I was a little paranoid. I didn't think that something was right. I have been riding the proactions since 97, and haven't seen one act like this. I wasn't sure if it was something with the Viper that was diferent.
Should I pull the shocks, and take the springs off of them and calaps the shocks? Should the rod go all the way in?
Should I pull the shocks, and take the springs off of them and calaps the shocks? Should the rod go all the way in?
if you take the big one to an auto shop they can pull the spring off it with a strut compressor. shock should drop compress all the way, smoothly. it might have a bent shaft.
yamaha98sx700
New member
Found the problem. Stupid me. When I repaired the crack in the w arm I put a brace across the bottom. I had no help setting up the suspension, so when I pushed it down, I had no one to look up in the tunnel to see what was going on. The brace was hitting on the front of the main shock. Cut it out and it works fine now.
Sorry Guys!!
Had a chance to put 150 miles on it this weekend, it seems to work very nice so far. Between the studded track the viper suspension, bethvipers upgrades and the usi skis. What a difference, it is like a totally different sled.
Sorry Guys!!
Had a chance to put 150 miles on it this weekend, it seems to work very nice so far. Between the studded track the viper suspension, bethvipers upgrades and the usi skis. What a difference, it is like a totally different sled.
Last edited: