otis700
Member
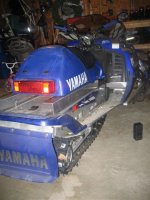
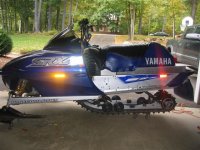
For those SRX faihful out there, I thought I'd share pics of my seat and handlebar riser project. Starting with the seat first which will be raised 5-6" in total between the aluminum risers I added as seen in the pics and from a makeover of the stock seat.
Hopefully it'll look pretty decent in the end. Couldnt afford the XTX this year so this will keep me going for another year.
Hopefully it'll look pretty decent in the end. Couldnt afford the XTX this year so this will keep me going for another year.
otis700
Member
CdnSxR6
New member
Great mod....Keep us posted.


 can you post the stuff used to do the seat mod length height thickness of the meatal used ...i can see i will be doing tthis one for comfort hats off to you on this one i am just wondering how the seat will meet the tank and how it will look ...any pics with the seat just sitting on it so we can see how it will look ..........thanks cant wait .....
 otis700
Member
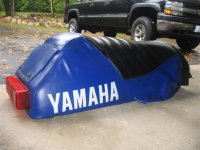
seat
The stock seat has been modified pretty significantly. I had to remove the plastic bottom front half enough to allow the seat to come right up to the tank cap so its much more rider forward. I also removed the staples from underneath and added 4 " foam across the top so the seat is straight across like the new style seats. I may need to bring the seat to an upholsterer to get it to look just right, we'll see.
The seat will mount in the front to the new aluminum side sections with snaps like the stock seat.
Im traveling today but will have more pics this weekend.
Mark
otis700
Member
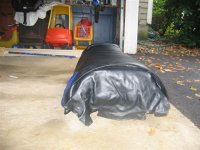
seat progress
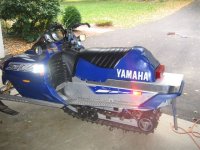
Hey everyone, attached are some recent pics of my srx riser prpject. I will be sending the seat to an upholsterer this week to add some more snaps. Overall, the seat is raised about 5" with the addition of the aluminum riser and foam. The seat has also been moved forward 6". I plan to add an aluminum trunk door to leverage all my new storage space under the seat. : )
Mark
Attachments
Student Driver
New member
I like how you shaped that narrow at the top.
That will make a nice difference going from sitting to standing etc.
The one part that will take a little getting used to is in getting your boot accross the seat when going from side to side.
I went through that when going to the Dragon as it also has the tall seat like that.
It starts to feel normal after about 1 day of riding though.
Then you will not want to go back to standard short height.
yamahatd
New member
That thing looks awsome. I wonder how it will be on the trail? With all that new hieght it will most likely slow you down.
How do you expect to keep up with my Apex RTX? All in all I comend your enginuity.
How do you expect to keep up with my Apex RTX? All in all I comend your enginuity.
otis700
Member
sled
Thanks for the comments.
I expect the sled to be a bit slower and colder but still shouldnt be a problem staying ahead of that apex of yours. : )
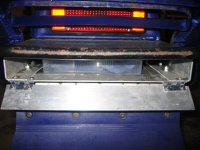
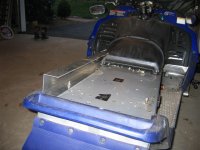
The seat mod is complete and will start mounting it tomorrow which now requires 4 snaps per side. I also designed and ordered additional aluminum pieces for the rear of the sled and they will be ready in a week or so. The rear will have a 12 x 16 aluminum sheet behind the seat for additional storage if needed.
Also ordered the powermadd pivoting riser with 4" of rise.
Will have more pics this weekend.
Thanks for the comments.
I expect the sled to be a bit slower and colder but still shouldnt be a problem staying ahead of that apex of yours. : )
The seat mod is complete and will start mounting it tomorrow which now requires 4 snaps per side. I also designed and ordered additional aluminum pieces for the rear of the sled and they will be ready in a week or so. The rear will have a 12 x 16 aluminum sheet behind the seat for additional storage if needed.
Also ordered the powermadd pivoting riser with 4" of rise.
Will have more pics this weekend.
yamahatd
New member
bars
Let us know after your visit to "Wrinckles Wracing" if the Apex bars and riser are going to work with the seat height.

Let us know after your visit to "Wrinckles Wracing" if the Apex bars and riser are going to work with the seat height.
otis700
Member
otis700
Member
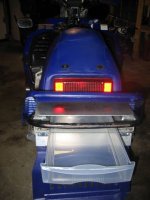
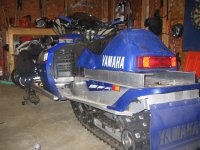
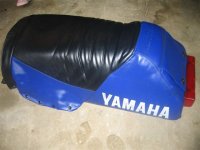
seat semi-attached
Here's a pic of the seat semi-attached. I am waiting for the aluminum side brackets before I can pull down the front of the seat and attach the front snaps.
If I could attach the snaps to the gas tank with epoxy or some other adhesive, this would be preferred but I expect the snaps would not stay in place.
Mark
Attachments
otis700
Member
otis700
Member
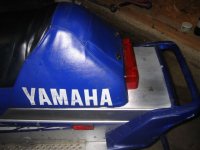
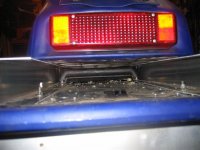
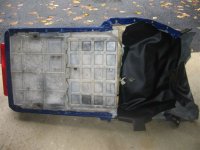
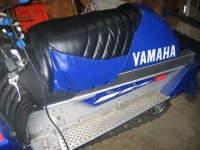
final seat and storage
For anyone interested,
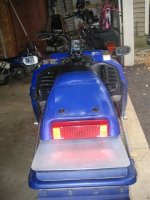
Below are pics of how might seat project ended. It worked out real nice in terms of form and function. I moved the bumper and rear plastic covering up and created a hinged door. The storage area fits two of the plastic totes shown and the sled rides awesome. Even my REV XP buddies are impressed with the change in riding position! : )
see ya.
For anyone interested,
Below are pics of how might seat project ended. It worked out real nice in terms of form and function. I moved the bumper and rear plastic covering up and created a hinged door. The storage area fits two of the plastic totes shown and the sled rides awesome. Even my REV XP buddies are impressed with the change in riding position! : )
see ya.