As some of you may know, I decided to ditch the Yamaha Proaction rear skid on my 03 Viper and have been looking for something better. I had a thread about it in one of the forums. Well I found a 2007 Polaris IQr 440 skid, with the Walker Evans shocks. It was shipped from Utah, and showed up today, so the project begins. I thought I'd do a working log thread on it as it progresses, that way someone can learn a little and see a few pics if they want to do something similar. They can learn from my mistakes and have an idea of what is all involved in a project like this. I'm new to this skid swapping business myself, but I've been reading up on it for the last month and happened to find someone with a lot of experience doing this to have as a resource. Of course, there's always help available on this great site as well. So we'll see how it goes! 


Good luck with the project I hope it goes smooth..Nick
To start with, of course, I had to remove the Yamaha Proaction skid. It was pretty easy until I got to removing the front-most mounting point, the infamous W-arm. I don't have any pics of it, so I'll try to explain. The W-arm top shaft is hollow, and there is a shaft inside that the bolts thread into. The problem is, this shaft is free to spin, so if you try to loosen the mounting bolts you will simply turn the shaft and not loosen anything.
So I'm sitting out here in the shop with a ratchet trying to get these bolts loose, getting absolutely nowhere because I didn't realize what was going on. After a long while I finally realize the shaft is spinning. What do I do now? Search the TY forums of course!
  5 min later I found out you need an impact wrench to spin these off. First you tighten one side. Then spin the other side loose. And if you're lucky you can come back and get the side you tightened loose too. Worked like a charm, and out came my old skid.
Next step is to set the sled up at a level where you can easily work on it. I chose to get it sitting exactly how I want it to ride, as in how far I want the rear bumper to be off the ground when the sled is done and on the ground.
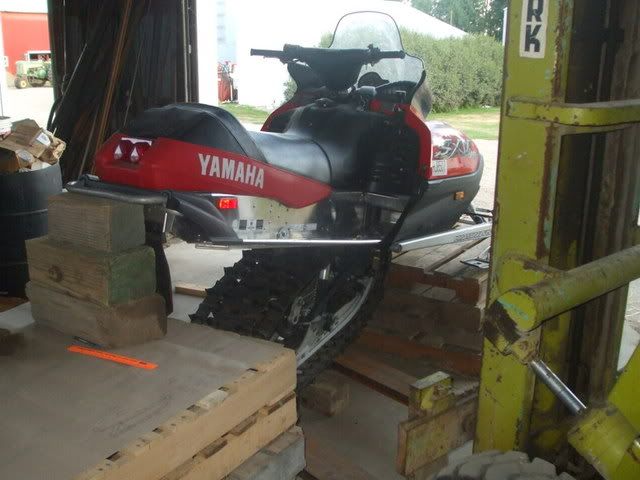
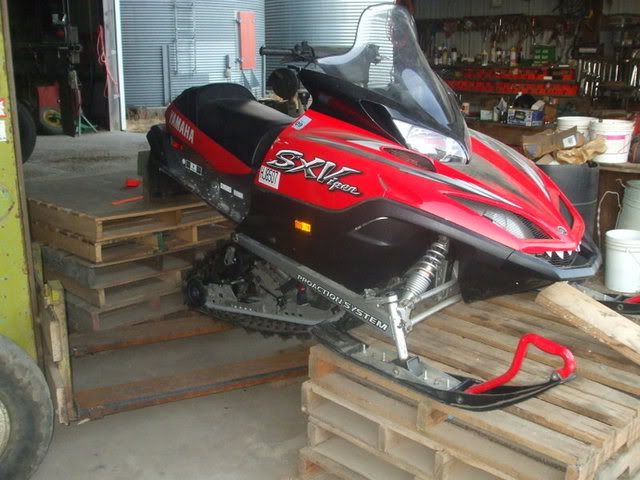
I set the sled up on pallets so the skis were 20" off the floor in front. I then set more pallets in the back and used blocks to get the rear bumper at the proper height. I used a forklift with fork extensions to carefully pick up the sled and set it on the pallets in front, then had it supported in back with a big 6"x6" as I set the rear pallets into place.
Here's how I calculated what height to set the rear at:
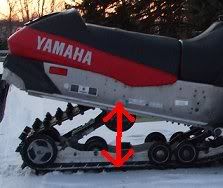
The skis are sitting 20" off the floor. So the simulated ground level will be 20" front and back. Next I needed the total thickness of the track, which I found to be 1.75". Then I needed the distance from the center of the rearmost mounting hole to the bottom of the slide to find the stock viper ride height. (see pic below) A TY member measured for me this morning and it is 11.5".
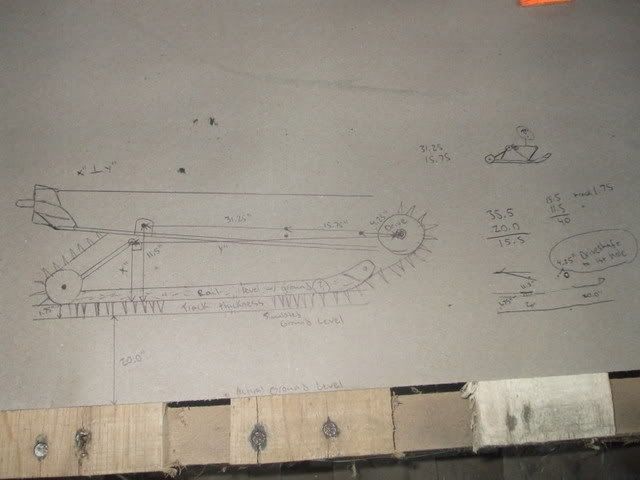
I added all these number together and got 33.25". This is how high I needed to set the rear of the sled off of the floor for the stock viper ride height. Then finally I added an additional 2.25" for more lift in the rear, more on that later. So my final height in the rear was 35.5", measured from the floor to the center of the rearmost mounting hole. I sketched this all out on a piece of cardboard on one of the pallets while I was waiting for UPS to show up with the skid (yes, I was pretty much sitting there waiting for it all morning..haha)
Here's a pic of that, just because I thought it looked kinda cool
More coming tomorrow.
So I'm sitting out here in the shop with a ratchet trying to get these bolts loose, getting absolutely nowhere because I didn't realize what was going on. After a long while I finally realize the shaft is spinning. What do I do now?
 Search the TY forums of course!
  5 min later I found out you need an impact wrench to spin these off. First you tighten one side. Then spin the other side loose. And if you're lucky you can come back and get the side you tightened loose too. Worked like a charm, and out came my old skid.
 Next step is to set the sled up at a level where you can easily work on it. I chose to get it sitting exactly how I want it to ride, as in how far I want the rear bumper to be off the ground when the sled is done and on the ground.
I set the sled up on pallets so the skis were 20" off the floor in front. I then set more pallets in the back and used blocks to get the rear bumper at the proper height. I used a forklift with fork extensions to carefully pick up the sled and set it on the pallets in front, then had it supported in back with a big 6"x6" as I set the rear pallets into place.


Here's how I calculated what height to set the rear at:
The skis are sitting 20" off the floor. So the simulated ground level will be 20" front and back. Next I needed the total thickness of the track, which I found to be 1.75". Then I needed the distance from the center of the rearmost mounting hole to the bottom of the slide to find the stock viper ride height. (see pic below) A TY member measured for me this morning and it is 11.5".

I added all these number together and got 33.25". This is how high I needed to set the rear of the sled off of the floor for the stock viper ride height. Then finally I added an additional 2.25" for more lift in the rear, more on that later. So my final height in the rear was 35.5", measured from the floor to the center of the rearmost mounting hole. I sketched this all out on a piece of cardboard on one of the pallets while I was waiting for UPS to show up with the skid (yes, I was pretty much sitting there waiting for it all morning..haha)
Here's a pic of that, just because I thought it looked kinda cool

More coming tomorrow.
xsivhp
Active member
Air tools really make skid removal much easier. I usually loosen the bolts and run them in and out a couple of times then they'll come out easier.
I haven't had too much time to work on it the last 2 days. I wrestled the skid into the track as seen in the pictures, and I lifted it up with the forklift to see appoximately where it would sit. When I get some time and more done I'll get some pics and an update.
I had a chance to work on it today and made some pretty good progress.

I got mounting dimensions for a Polaris Pro-X skid on the JB Shocks website (www.jbshocks.com ). I was basically looking for one measurement, and that is the distance from the flat of the driveshaft to the first mounting hole.
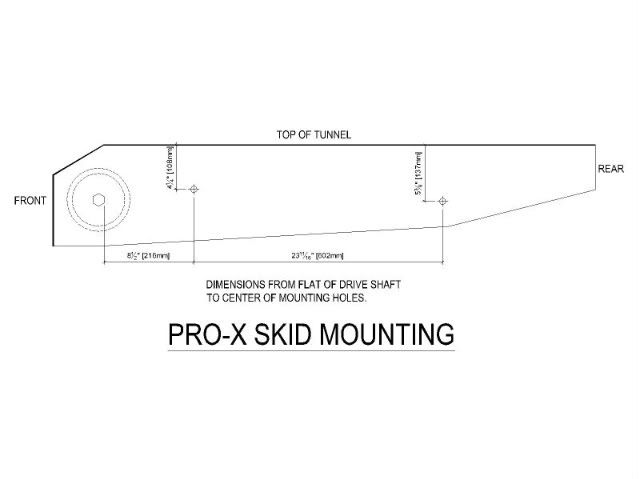
I found that measurement to be 8 1/2".
Next I made a few measurements on the skid with it sitting flat on the floor, out of the sled, and with the limiter straps fully extended. I measured the distance from the center of the front mounting hole to the floor (12 5/8"), the distance from the center of the rear mounting hole to the floor (13"), and finally the center to center distance between the front and rear holes (23 1/4") Remember those!

Now back to the 8 1/2" measurement. The next step was to draw an arc on the inside of the tunnel at 8 1/2" from the flat of the driveshaft. I would be able to put the front mounting hole for the skid anywhere on this arc as long as it was 8 1/2" from the flat of the driveshaft at all points. To make the arc, I put a string around the driveshaft, and then tied the end of a marker to the string at 8 1/2". Then I carefully drew the arc, guided by the string, and then measured again after to check accuracy. I repeated this on the other side.


I now needed to find where to drill the hole on the arc. I needed to find the correct height for the front hole. To do this I added the 12 5/8" + 1 3/4" + 20" = 34 3/8". (see diagram) This is how high the front mounting hole needed to be drilled above the shop floor as the sled is sitting now. After finding this, I measured and used a center punch to make a guide for the drill bit in the correct spot on both sides. Then I drilled the holes out, starting with a small bit and working my way up to a 7/16" hole to be as precise as possible. The holes ended up being down in the footwell area behind the steering support, which is good because they are easy to get at and won't interfere with anything.

With the front holes drilled, I loosely bolted in the front of the skid. I'll need to get longer bolts and spacers because the IQ skid is almost an inch narrower than the tunnel, but that's not much of an issue and I'll deal with that later. I'll also need to make a support bracket to strengthen the area around the hole later.
That's about as far as I got today. I've discovered there's a slight problem with where the rear mounting point will be, but I have a few ideas to fix it and I'll address it tomorrow if I have time.

I got mounting dimensions for a Polaris Pro-X skid on the JB Shocks website (www.jbshocks.com ). I was basically looking for one measurement, and that is the distance from the flat of the driveshaft to the first mounting hole.

I found that measurement to be 8 1/2".
Next I made a few measurements on the skid with it sitting flat on the floor, out of the sled, and with the limiter straps fully extended. I measured the distance from the center of the front mounting hole to the floor (12 5/8"), the distance from the center of the rear mounting hole to the floor (13"), and finally the center to center distance between the front and rear holes (23 1/4") Remember those!

Now back to the 8 1/2" measurement. The next step was to draw an arc on the inside of the tunnel at 8 1/2" from the flat of the driveshaft. I would be able to put the front mounting hole for the skid anywhere on this arc as long as it was 8 1/2" from the flat of the driveshaft at all points. To make the arc, I put a string around the driveshaft, and then tied the end of a marker to the string at 8 1/2". Then I carefully drew the arc, guided by the string, and then measured again after to check accuracy. I repeated this on the other side.


I now needed to find where to drill the hole on the arc. I needed to find the correct height for the front hole. To do this I added the 12 5/8" + 1 3/4" + 20" = 34 3/8". (see diagram) This is how high the front mounting hole needed to be drilled above the shop floor as the sled is sitting now. After finding this, I measured and used a center punch to make a guide for the drill bit in the correct spot on both sides. Then I drilled the holes out, starting with a small bit and working my way up to a 7/16" hole to be as precise as possible. The holes ended up being down in the footwell area behind the steering support, which is good because they are easy to get at and won't interfere with anything.

With the front holes drilled, I loosely bolted in the front of the skid. I'll need to get longer bolts and spacers because the IQ skid is almost an inch narrower than the tunnel, but that's not much of an issue and I'll deal with that later. I'll also need to make a support bracket to strengthen the area around the hole later.
That's about as far as I got today. I've discovered there's a slight problem with where the rear mounting point will be, but I have a few ideas to fix it and I'll address it tomorrow if I have time.
Last edited:
Wow...I'm impressed...look's like you know your way around a shop...keep us posted...cheers
Why are you moving the front arm and rear arm closer together by 1/2 inch. That will make the skid pretty much fully coupled all of the time, and stiff. Maxdlx
maxdlx said:Why are you moving the front arm and rear arm closer together by 1/2 inch. That will make the skid pretty much fully coupled all of the time, and stiff. Maxdlx
I didn't move the arms closer. The center to center on the IQ skid as it sits fully extended is 23 1/4", it's not quite as far apart as the Pro-X skid in the JB Shocks diagram. I only used that diagram to get the distance from the driveshaft to front arm, which will work also for the IQ skid, and I ignored the rest.
Ok I just saw the difference in mounting hole distance. Looks good so far. Maxdlx
Well I got time to work on it some more the last few days.
I have the front holes drilled and the front of the skid loosely bolted in.


It's nice to have the front mounted, because now I can just swing the skid up into place as needed, and support it with a block or 2. But, as I mentioned briefly in the last update, I ran into a problem. I swung the skid up to the correct postion with the mounting hole 34 3/4" above the floor, and here's what I found:

The holes needed to be exactly at the same level as the side heat exchangers! Obviously I can't drill into those! I didn't want to move the mounting location either. If I moved the rear mounting location I would also have to move the front mounting location accordingly. That would mean re-calculating everything, drilling new holes, and basically starting all over. Not to mention it would also change the ride height, which I did NOT want.
So after sitting there and staring at it for a decent period of time, I had an plan:
The IQ skid is almost exactly 1" narrower than the Yamaha Proaction. So I had 1/2" of free space to work with between the shaft and tunnel on each side. So I came up with a bracket that allows the skid to be mounted where it needs to be while using up the available gap and re-using the mounting holes from the old skid.

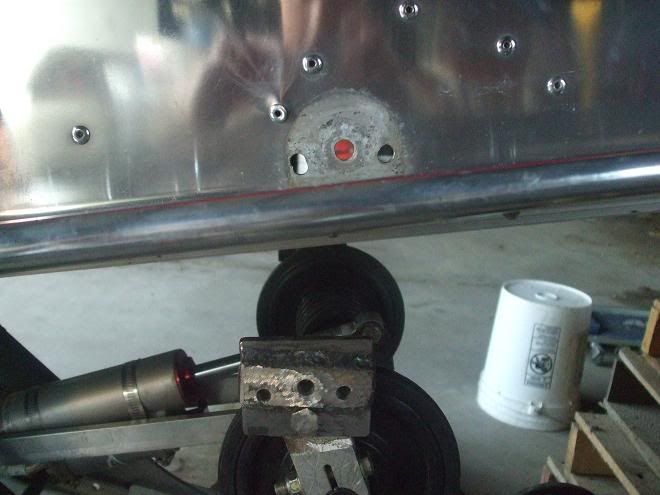
I actually made them out of my old drop brackets, which were 1/4" thick flat steel. Look at the pics, they probably explain them better than I can with text. But I cut off the top part with the holes, held both pieces in the tunnel with the skid in the correct spot, and then tacked them together back to back, creating a bracket that is 1/2" wide. There was also then a 1/4" gap underneath for the head of the skid mounting bolt. I drilled holes in the back piece to match the front piece and the old holes in the tunnel. Of course I also welded them together thoroughly once I could get them out of the sled.
I have the front holes drilled and the front of the skid loosely bolted in.


It's nice to have the front mounted, because now I can just swing the skid up into place as needed, and support it with a block or 2. But, as I mentioned briefly in the last update, I ran into a problem. I swung the skid up to the correct postion with the mounting hole 34 3/4" above the floor, and here's what I found:

The holes needed to be exactly at the same level as the side heat exchangers! Obviously I can't drill into those! I didn't want to move the mounting location either. If I moved the rear mounting location I would also have to move the front mounting location accordingly. That would mean re-calculating everything, drilling new holes, and basically starting all over. Not to mention it would also change the ride height, which I did NOT want.
So after sitting there and staring at it for a decent period of time, I had an plan:
The IQ skid is almost exactly 1" narrower than the Yamaha Proaction. So I had 1/2" of free space to work with between the shaft and tunnel on each side. So I came up with a bracket that allows the skid to be mounted where it needs to be while using up the available gap and re-using the mounting holes from the old skid.


I actually made them out of my old drop brackets, which were 1/4" thick flat steel. Look at the pics, they probably explain them better than I can with text. But I cut off the top part with the holes, held both pieces in the tunnel with the skid in the correct spot, and then tacked them together back to back, creating a bracket that is 1/2" wide. There was also then a 1/4" gap underneath for the head of the skid mounting bolt. I drilled holes in the back piece to match the front piece and the old holes in the tunnel. Of course I also welded them together thoroughly once I could get them out of the sled.
Now that I had the rear done, the next thing was to put a support plate around the front skid mounting holes for strength. The tunnel aluminum is thin and can't be expected to hold the front of the skid and take abuse without support. I didn't need support in the rear because I was right on top of the old yamaha support bracket, but in the front it was just one layer of aluminum. So I found some more 1/4" flat steel and made 2 plates. I placed them so they bolted right into the steering support down in the footwell area, and they should provide good support. It was a little tricky drilling the holes into the steering support from the inside, because I didn't know exactly where they were going to end up, but it ended up working well.
Aluminum would have been the ideal material to use for all these brackets, but I didn't have any around, and I have no experience trying to weld it. The steel I used I had laying around, but it's heavier and of course can rust. So I cleaned up all the brackets and painted them with a gloss black rust-protecting paint, hopefully that will protect them for a few years at least.


Aluminum would have been the ideal material to use for all these brackets, but I didn't have any around, and I have no experience trying to weld it. The steel I used I had laying around, but it's heavier and of course can rust. So I cleaned up all the brackets and painted them with a gloss black rust-protecting paint, hopefully that will protect them for a few years at least.


Last edited:
After the paint dried, I re-installed everything with the track on this time. Everything lined up and went in pretty smoothly.


The only thing it needs now is longer bolts in the front, so I can tighten up the front mounts. The track tension is also set too tight right now, I'll have to mess that too. Otherwise it's about done. My rat terrier, Jake, sits by the pallets in that same spot everytime I work on it. I see he made it into 2 pictures now! But by now he is entirely way too bored with this project, and I'm sure wants me to start on something else. I wonder what his opinion is about clutching and heelclickers


The only thing it needs now is longer bolts in the front, so I can tighten up the front mounts. The track tension is also set too tight right now, I'll have to mess that too. Otherwise it's about done. My rat terrier, Jake, sits by the pallets in that same spot everytime I work on it. I see he made it into 2 pictures now! But by now he is entirely way too bored with this project, and I'm sure wants me to start on something else. I wonder what his opinion is about clutching and heelclickers
Last edited:
make sure you either loctite all bolts or use lock nuts on them. Even the 2 that go into the rear swingarm brakets. I found out the hard way on this. looks good and will ride even better. have you checked the approach angle yet. Maxdlx
Seems like more work to make that IQ work over the edge I used...you did good though, she'll ride sooo nice now you wont want to get off that thing!
Looks pretty damn sweet man! Nice job!!
Thanks for the comments guys.
Well the project is pretty much finished. I messed around with the suspension, set the torsion springs to my weight, and there's not a whole lot else I can do until I can take it for a ride and try to get it dialed in. When I do ride it I'll try to get a ride report up in here if I remember. I am really excited to ride it though, I half considered getting the motor all ready to go again and taking it for a spin around the yard. But I decided not to - it's all fogged and summerized and there's still quite a bit of time before winter.
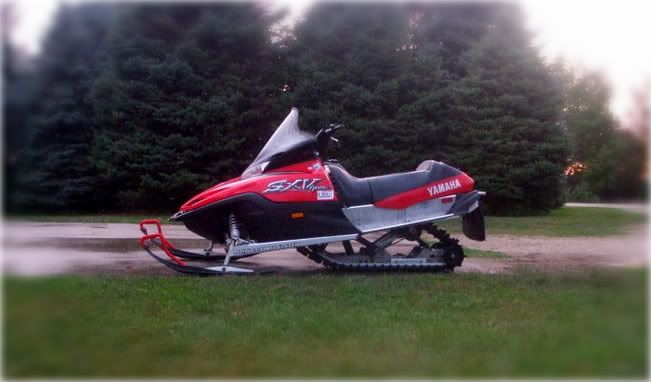
Well the project is pretty much finished. I messed around with the suspension, set the torsion springs to my weight, and there's not a whole lot else I can do until I can take it for a ride and try to get it dialed in. When I do ride it I'll try to get a ride report up in here if I remember. I am really excited to ride it though, I half considered getting the motor all ready to go again and taking it for a spin around the yard. But I decided not to - it's all fogged and summerized and there's still quite a bit of time before winter.


looks good...gonna be tearin apart my 97 SX 700 in the next couple days here...gonna put piston rings in, hyfax, and check over every inch of the sled and clean it up
Yeah, it's definitely getting to be that time of year again, time to start getting the sleds ready. I almost wish I had more to do - now the skid is done, tunnel polished, and I have nothing to do until winter. The forum here is starting to wake up too in the last week or two.


