yamychris
New member
I just purchased a torque limiter from yamaha, there is no directions, NEED HELP
Yamasquaw
Member
- Joined
- Jan 8, 2005
- Messages
- 235
If you pop off secondary and primary, you can see the bolt pattern for the torque arm on the frame. It goes on the back side of the frame. Take some steady hands and a magnet if you drop a bolt. Yamaha put all the mounting for one but never actually did it from factory. Hope this helps.

Just to add. Remove the carbs and the boot that goes to the reed cage. This will give you alot more room to work in.
yamakazie
New member
The primary does not need to be removed. Use loctite on the allen bolts that go into the case. Leave the bolts on the frame mount loose till you get the torque bar installed. This will help get the bolts through the bushings.
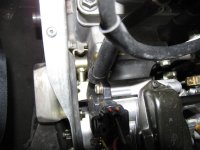
Well my torque limiter require me to remove both primary and secondary along with the carbs and boot. Here's some pics of mine installed. I put the bracket onto the block (loctite of course) first. Next, install the bracket onto the side frame but leave the bolts loose. Then put the arm in. Bolted the block side first and then the other side. Lastly tighten the two hex head bolts that where loose before.
Attachments
Yamasquaw
Member
- Joined
- Jan 8, 2005
- Messages
- 235
I did mine years ago and i'm sure all i did was remove clutches, and thats all.Didn't remove carbs, but it is tight.
It is tight. Should align the motor before you torque it down. Then she's perfect.
I would like to do the same thing. How exactly do you align the motor?YamerDown said:It is tight. Should align the motor before you torque it down. Then she's perfect.
yamychris
New member
Installed today, not a fun task. you have to remove the secondary clutch and the air box and carbs. otherwise it went smoooooooooth. plan on 2-3 hours and a 6-12 pack.

Installing SRX Engine Torque Arm onto a Viper. Kit # SMA-ENGIN-ST-AY
Just installed my third of these kits on Viper sleds. Once you've done 2 of them, you get it down. The third one yesterday took me abouty an extra half hour; I also cleaned the guys carbs for him since I had his carb rack off anyways.
TEAR DOWN:
1. Open hood.
2. Remove Primary and secondary clutch. (mandatory to remove them both I think).
3. remove air box.
4. Remove carb rack (gotta be done, but takes loosening a whole 6 screws to loosesn up the carb boots on each side, 3 which you've already removed to remove airbox).
5. Viola, you are there and commence installing the torque limiter.
TO INSTALL: USE RED LOCTITE ON ALL BOLTS
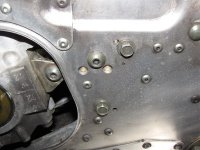
1. First install the 2 bolts into the back side of the motor. Feel free to tighten them down (Recommend to use red loctite).
2. Then place the dog bone into place and run bolts through both dog bone holes -- into both brackets. The frame bracket should just be loose in there so far -- just connected to the dog bone.
3. Then maneuver the frame bracket into place and install the bolts.
4. Get the bolts in there, get the red loctite on there and tighten everything down.
!")
Just installed my third of these kits on Viper sleds. Once you've done 2 of them, you get it down. The third one yesterday took me abouty an extra half hour; I also cleaned the guys carbs for him since I had his carb rack off anyways.
TEAR DOWN:
1. Open hood.
2. Remove Primary and secondary clutch. (mandatory to remove them both I think).
3. remove air box.
4. Remove carb rack (gotta be done, but takes loosening a whole 6 screws to loosesn up the carb boots on each side, 3 which you've already removed to remove airbox).
5. Viola, you are there and commence installing the torque limiter.
TO INSTALL: USE RED LOCTITE ON ALL BOLTS
1. First install the 2 bolts into the back side of the motor. Feel free to tighten them down (Recommend to use red loctite).
2. Then place the dog bone into place and run bolts through both dog bone holes -- into both brackets. The frame bracket should just be loose in there so far -- just connected to the dog bone.
3. Then maneuver the frame bracket into place and install the bolts.
4. Get the bolts in there, get the red loctite on there and tighten everything down.
Last edited: