Rob VanSydenborgh
New member
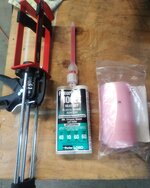
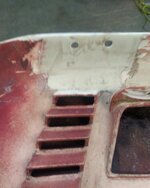
Anyone have an idea what to use to repair a crack in the hood on my '02 Viper? I have a 5" long crack on the corner of my hood by the hold down strap. I'm hoping there is some kind of Epoxy solution that would work...
Thanks.
Thanks.
mattyg1405
New member
Rob VanSydenborgh said:Anyone have an idea what to use to repair a crack in the hood on my '02 Viper? I have a 5" long crack on the corner of my hood by the hold down strap. I'm hoping there is some kind of Epoxy solution that would work...
Thanks.
i do not think ive ever heard of successfully repairing a crack like that with epoxy...
on the cheap and to prevent it from spreading until you want to spend the money on a hood i would drill the end of the crack and then drill holes on both sides of the cracks and zip-tie them together with blue zip ties. i know this is not pretty by any means but will prevent further damage...
i have actually tried a few epoxies with mixed results. i did find one that worked, unfortunately i dont recall which one. the ultimate trick ended up being the use of some drywall mesh tape inside the hood embedded with the epoxy. held up all last season and still holding. i will let you know what it was when i find the rest of the product. mine was split for about 6" just above where the hood latch connects on the contour line.
I haven't done a Yamaha hood but I think Polaris is the same SME material.
I used two part Corvette bumper epoxy which remains somewhat plyable after it cures. Painter's Supply.
I drilled the end of the crack and drilled a series of holes on both sides of the crack and chamfered the holes towards the crack to keep the fiberglass thread low. Sewed the crack together, applied the epoxy outside and in making sure epoxy filled all the holes. I covered the epoxy in wax paper on the inside to smooth it out (didn't want to sand it), sanded, primed and painted the outside and it held up for 5-6 years and still looked good when I sold it.
The crack was at the rear corner of the hood so blending the paint was easier than if it where in the middle.
I think I spent about $25.00 in epoxy and Polaris paint. Cheaper than a new hood.
Rob VanSydenborgh
New member
Thanks all. I read also about a 3M product called Duramix but I don't know where to get it. Canadian Tire also has a Permatex product for plastic too. I might check with a local body shop to see if they have any advice. One person also told me they used epoxy from Wal-mart?! and added small metal tabs into the epoxy before it dried... It has held for several years.
Rob
Rob
duster_791
New member
My method to the madness... Expensive, but it works!
There are a lot of repair materials out there, but most of them are specifically designed for two or three types of plastics. I forget how many types of plastics that are used in automotive but it's something like 36? And identifying which one you have is kind of tricky. Someone out there must know what a yamaha hood is, but i don't.
SEM Makes an excellent product called "Problem Plastic" Which can be used on all types of plastic. SEM also makes reinforcement material. You'll need some if your repairing a crack. A good plastic cleaner is Crutial! before you start make sure you clean a large area around the crack. SEM has a couple great ones. after cleansing heres what you do-
1. bevel crack on each side with 36 or 80 grit by hand or mini grinder (slow speed!) you don't want to "smear" or melt the plastic
2. Scratch surrounding area on back side with 36 or 80, sand front side first near the crack with 80, and then surrounding with 180.
3. spread a thin layer of Problem Plastic on back side, then lay down a strip of repair cloth, spread another thin layer of resin, put a second strip of cloth down trying to criss cross the first cloth, and spread your final layer of resin. This is all done while wet, and be quick, it hardens up fast.
4. Spread as much material on front side as needed to fill the beveled edges and taper it off away from the crack, making it easy to featheredge off.
5. Sand front side with 180, 220, 320, and maybe add a coat of putty, and your ready for primer.
Like I said, a lot of steps, but it's worth it after you forget the crack was ever there, This is of course assuming your painting the hood. Lol If not, well hell I'd go with a drill and zip ties.
kirk700 srx
Member
Plastic welder bought from canadian tire or any autobody shop!


