sevenspeed
New member
Of course I searched AFTER I built my emergency spider removal tool. Some clever solutions here on how to remove those spiders.
I built mine in just 15 minutes or so using tools at my disposal in the garage.
First, the fixed sheave holder:
The sled I was working on today has three holes in the fixed sheave, but is not threaded. I considered tapping them to a size that did not require any drilling but decided against this so I would not change the balance or integrity --- and all hardware stores are closed here on Sunday night.
Sheave holder -- get ready -- is a 6' long 2x8. A 2x6 would also work. I drilled a hole in the center of the board about 8" from one end. Hole is about 2", and is drilled only deep enough to allow the PTO side of the sheave to extend into the wood so the sheave sits flush. Next, I traced the three sheave holes using a piece of paper. Rubbing the paper on the sheave in the hole area was enough to pick up the hole locations from the deposited oil. Used a punch to mark these on the board. I drilled (3) holes slightly smaller than the 2"x 5/16" bolts I inserted. That's it! Lay the clutch sheave onto this and then use a couple blocks of wood with a screw to clamp the sheave in place.
Spider holder:
Took another 6'x 2"x8" and drilled a hole in the center of the board approximately 8" from the end. I believe the drill bit size is 1 1/4". It should be the same size as the shaft. Next, I placed the board over the shaft and traced the three spider arms. 5 minutes with a jigsaw and some chisel action and I had three perfect arm impressions in the wood. Next I drilled a scrap of 2x4 with the same 1 1/4" drill and placed this over the first board; it's a giant washer. Finally, I used my clutch pulling tool with a large metal washer installed to tighten the top spider board to the assembly.
Now, I have two 6' long wrenches. You could screw one to a wooden floor, or just sit on the floor and use your legs to hold one board while pulling the other. Mine was tight for a full 4 turns before the effort reduced. Upon removal I found extensive rust and locktite residue left behind. Amazed I was able to get this apart. Lots of ways to get creative with this, and nearly free (even if you have to run to the hardware store)
I'll try to post pictures. Not as elegant as the setups I have now seen on here but VERY inexpensive and takes just about 15 minutes to fabricate. Hopefully this saves someone in an emergency. My friends would call this ghetto, but I could not wait to pick up more metal stock tomorrow when the stores open to build something more elegant -- and it WORKS!
For the spider holder you might consider drilling three holes and inserting three bolts to catch the edge of the arms if you don't have a saw or chisel. I think the clutch holding tool is a must in either case to keep the entire assembly tightly together while you wrench on it.
My parts are in the dishwasher now, and I'll have this back together quickly.
Good luck!
rrocheleau
New member
Would you have any photos of the finished tool.
Oh snap!
Well written - A little mapp gas on the spider would have helped.
Good work Captian!
Dishwasher? You married?
Well written - A little mapp gas on the spider would have helped.
Good work Captian!
Dishwasher? You married?
Lemayilleur
New member
This post comes up high for 'Yamaha clutch tool", so I'll post details of the process we went throught in order to seperate and open it up on my Phazer 2 II 1992
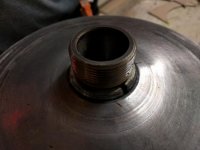
I bought a "18mm x 1.5" bolt for 5$. Added a lot of Teflon tape and did the water trick: https://www.youtube.com/watch?v=9KJ-1-F-s5I
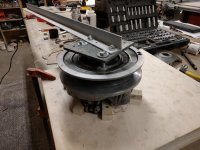
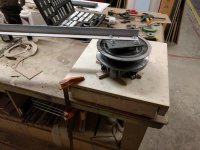
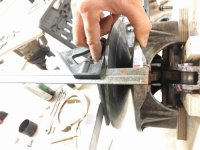
Then we made our own "Yamaha Grunt Tool" to separate the clutch sheave (see pictures).
Applied heat-gun to the sheaves until the spider shaft was as warm as we could get it.
Important: the sheave's thread is on the opposite direction - so you have to screw it in for it to come loose.
Also, you should mark your sheave and do your best to put it back together with your marks lined up.


Lemayilleur
New member
This post comes up high for 'Yamaha clutch tool", so I'll post details of the process we went through in order to separate and open it up on my Phazer 2 II 1992
I bought a "18mm x 1.5" bolt for 5$. Added a lot of Teflon tape and did the water trick:
http://www.youtube.com/watch?v=9KJ-1-F-s5I&t=0m37s
Then we made our own "Yamaha Grunt Tool" to separate the clutch sheave (see pictures).
Applied heat-gun to the sheaves until the spider shaft was as warm as we could get it.
Important: the sheave's thread is on the opposite direction - so you have to screw it in for it to come loose.
Also, you should mark your sheave and do your best to put it back together with your marks lined up.
View attachment 62293View attachment 62294View attachment 62295 View attachment 62296
Spider shaft torque specs is 185ft/lb : http://ty4stroke.com/attachments/primary-sheave-exploded-jpg.77303/
Clutch bolt toque specs is 80~, back off and then 44~ ft/lb: http://ty4stroke.com/attachments/primary-sheave-bolt-jpg.77294/
Last edited:


