striker7284bass
New member
Hello,
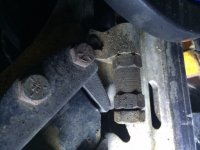
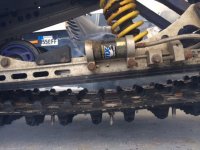
I have never adjusted a track on a sled before. I looked online and see the adjustment screw but it looks like mine might be turned all the way out I attached pictures of the screw and the slack I have now. How do I tighten the track Thank you.
I have never adjusted a track on a sled before. I looked online and see the adjustment screw but it looks like mine might be turned all the way out I attached pictures of the screw and the slack I have now. How do I tighten the track Thank you.
Attachments
greenmntpass
New member
Hey I just installed a m20 airwave suspension and I believe the track adjustment is the same. Your pic on the the right is the adjustment on the rail right in front of the rear wheel. One on each side that have to be adjusted equally as you can imagine. First back off the nut that's tight against the rail. The more you back it off the more you will be able to tighten the bolt which will in turn move the rear wheel back taking out the slack.
When you get it to the desired sag (which for me they wanted 3/4") tighten that rear nut up against the front one to lock it in place. Hope this helps
When you get it to the desired sag (which for me they wanted 3/4") tighten that rear nut up against the front one to lock it in place. Hope this helps
striker7284bass
New member
Your talking about the pic that shows the gas cartridge on the rail the bolt behind that it looks like it controls the yellow coil spring shock. The zoomed in picture of the bolt is the one right behind the rear wheel but it looks like it is tightened all the way in.
greenmntpass
New member
The one right behind the rear wheel. The reason it looks like its tightened all the way is because that nut to the right is tightened up against the rail. At this point it looks like the bolt is backed out most of the way. First off spray some wd40 on the threads and wire brush off grease and crap. It will help with backing the nut off and tightening. Next back that nut that's tight up against the rail back about a 1/2". Then tighten the bolt clockwise as it will start to move the wheel back. Take note of distance your moving the wheel back as you want the same on the other side. Looking at that blow up is there a spacer between the two nuts or is that gummed up threads?
striker7284bass
New member
The one right behind the rear wheel. The reason it looks like its tightened all the way is because that nut to the right is tightened up against the rail. At this point it looks like the bolt is backed out most of the way. First off spray some wd40 on the threads and wire brush off grease and crap. It will help with backing the nut off and tightening. Next back that nut that's tight up against the rail back about a 1/2". Then tighten the bolt clockwise as it will start to move the wheel back. Take note of distance your moving the wheel back as you want the same on the other side. Looking at that blow up is there a spacer between the two nuts or is that gummed up threads?
Yea it's a spacer connecting the two nuts together
greenmntpass
New member
I pm'd you. My airwave is the same setup without the spacer. Not needed. Back the bolt out remove spacer. Clean threads off as noted above. Then put the nuts back on up to the head of the bolt. So now you have a loose bolt in your hand with two nuts screwed on all the way up to the head of the bolt. Now place bolt in threaded hole and tighten to desired sag. Then screw front nut up to rail tight and then tighten the second nut up to the back of the first.
that adjustment is all used up, looking at mine, I have about 2" of thread showing with a fairly new track. If the sliders are worn, new ones will get rid some slack in the track, some track windows are big enough to let you push the slider through without removing the skid. Pulling the bolt out and getting a longer one is an easy option. Don't forget to loosen the rear axle, the 9/16" bolts do not have to come right out.


