vipertripplexxx
New member
If your installing a m-10 skid out of a different make of sled check out this post. mine was out of a polaris, and those mounting kits are a bunch of $$$$$.
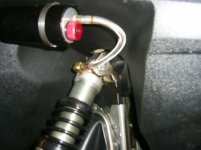
i'll just transfer the stuff I wrote the post no longer has the pics attached, here goes. I had to through A pic of the front shock conversion in, they are sweeeett!!!! Old snowpro shocks with some valving changes.
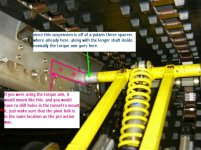
Wow that took me long enough! sorry bout that. lets get to it. The suspension I have is out of a polaris, and it does not use the torque arms. If you have A torque arm suspension, then you could line up the piviot holes(m-10) with the pro-action front mounting holes(sled), and transfer the torque arm mount holes to the tunnel. I would keep the torque arm level with the bottom of the tunnel.
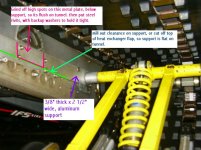
As for the tunnel supports, some basic aluminum flat stock works, check your local hardware store. I used 1/4" thick x 2 1/2" wide, you will need 2 1/2 feet. basically find a way to get it to sit flat on the tunnel. I milled some, ground some. Don't be shy, grind that S^#t off.
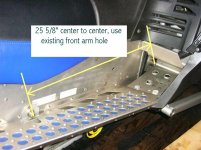
to find the rear hole location, measure back from the center of the front pivot hole 25 5/8" inch. and use the stock metal flanged washer to get the height. This is the washer thats used between the tunnel and rear bolt (see pics). reuse it when mounting the rear pivot shaft. Use a bullet point drill it won't walk, and move your hole location. you'll notice the rear hole is now further foward than the stock location, but at the same height. I threw a rivit in washer for the h#ll of it, it also helps guide the drill when you go transfer the holes to the homebrew tunnel supports.
Now there were some rivits you had to grind off to get the plates flush to the tunnel. from the outside of the tunnel, drill those holes through the homemade supports. use some nuts and bolts through front pivot holes, to hold the plates in position, and rivit them in. use steel or stainless rivits, not aluminum. Now drill out the rear hole in the supports. Add some extra rivits through the tunnel into the supports and your done.
This setup keeps your track tension perfect, and won't scrape the tunnel w/ room for studs.

Attachments

very nice install 

the skid is in the house, new parts ordered, shocks sent to be tore down, got quotes on crome and powdercoating. bought a repair kit to fix the front arm bolt hole problem.
i am making my big wheel kit from yamaha rails and cuting the rear arm for clearance(me and the same old crazy stupid crap i do to everything that is good, change it)
need to decide on aluminum or yamaha wheels on skid.
i am making my big wheel kit from yamaha rails and cuting the rear arm for clearance(me and the same old crazy stupid crap i do to everything that is good, change it)
need to decide on aluminum or yamaha wheels on skid.
vipertripplexxx
New member
BTV
If you want some specs on valving those m-10 shocks let me know. I have been doing alot of testing, and have got some good combos depending on what you want out of your suspension. The m-10 is kind of a tricky bugger cause it's a falling rate suspension. The best thing you can do if your under 225lbs is loosen up the rebound dampening, it helps alot.
Cheers, Steveo
vipertripplexxx
New member
Almost forgot to tell you, the weight transfer problem can be drastically improved if you install a 1/2 longer shaft in the front shock. The problem is the shock only extends out so far and it's like having your front limiter straps to tight. What you need is a front shock with a resivoir, when you take the floating piston out of the shock it leaves head room for the added shaft length. Cut two/three coils off of your stock spring, and add a four inch, sixty pound per inch baby spring. This setup rocks!!!! Heres what it does...
The spring is compressed alot when you sitting on the sled. about the first two inches of travel are very soft, then when the coils bind it stiffins up, and the stock spring takes over. In addition the added travel and push from the baby spring helps drastically with weight transfer, even when using the stock coupling blocks. Win Win situation right? Depends on how you ride. Powering through corners tends to take weight off of the skis, thus pushing. I'm going to install a limiter strap this year for tweaking. Deycore has all the shafts and springs, very resonable prices. This also allows you to take out alot of rebound dampening, which helps with transfer and ride. Ever see those motocross guys suspensions? The tires are always on the ground! Thats progresive rebound dampening, with the right spring combo!!!
The spring is compressed alot when you sitting on the sled. about the first two inches of travel are very soft, then when the coils bind it stiffins up, and the stock spring takes over. In addition the added travel and push from the baby spring helps drastically with weight transfer, even when using the stock coupling blocks. Win Win situation right? Depends on how you ride. Powering through corners tends to take weight off of the skis, thus pushing. I'm going to install a limiter strap this year for tweaking. Deycore has all the shafts and springs, very resonable prices. This also allows you to take out alot of rebound dampening, which helps with transfer and ride. Ever see those motocross guys suspensions? The tires are always on the ground! Thats progresive rebound dampening, with the right spring combo!!!
Last edited:
OLDCAT
New member
- Joined
- Jun 12, 2003
- Messages
- 59
vipertriplexxx...could you post a picture of this? it makes sense but exactly how long a shaft are you running? i have the remote ohlins already revalved ....if i were to do this do ya think that i would have to revalve again? thanks!!!
sandmanmike1
New member
I hate that I don't have one. I have a 94 VMAX 600 ST long track and suspension sucks but It runs good and beats not having a sled at all.
03viperguy
Moderator
I thought the early short skids were lighter then the later ones anyway?? thought they beefed up a few spots or added wheels or something...
03viperguy
Moderator
o, and for less money has anyone considered the new bender mono shock retrofit?? sounds SWEET! and I personally think the m-10 is old tech that has been caught up to be the factories. especially now that yammi has the mono shock 


vipertripplexxx
New member
Oldcat,
I will get you some pics when I get out to my storage facility in a week or so. I originally posted I used A 60lb spring, but the smallest one deycore offers is 80lbs. I would almost swear it's a 60lb spring, anyway I suppose an 80 would work. As far as the shaft length goes, i can't remember which part number it was, I just measured what I had and ordered a shaft close to a 1/2" longer. I made my own spring separators out of delrin, cause the aluminum ones that deycore sells scuff the s#(^ out of your springs.
I will get you some pics when I get out to my storage facility in a week or so. I originally posted I used A 60lb spring, but the smallest one deycore offers is 80lbs. I would almost swear it's a 60lb spring, anyway I suppose an 80 would work. As far as the shaft length goes, i can't remember which part number it was, I just measured what I had and ordered a shaft close to a 1/2" longer. I made my own spring separators out of delrin, cause the aluminum ones that deycore sells scuff the s#(^ out of your springs.
well, i have three now.
one fixer upper with ohlins clickers front and rear
one in good condition(kinda)that i got just to get the ACE off of it this is a fox
one that is new with the cheap gas bag shocks on it. this one is in my viper and wow does it ride good. i cut 1/4in off the bottom of the bock and set the limiters out all the way and the thing rides and handles great. it gives the feel of being tippy as it sits alot higher but it is just an illusion. gas bag shocks dont seem to fade so far. the only draw back is that there is no clicker for me to constantly mess with.
the gas bag shock one will alow you to install an extra wheel kit in the middle
installation with the torque arms sucks. i didnt use the factory holes and bolted the touque arm through the handle bar pole. this is the most reinforced section of the bulkhead and the oblong hole looked like it was weak.
i will be selling one of these later after i assemble the other two.
any other points you guys can help me or others with post on here.
and yes, 135 mls on the m10 and the slides are burned in half and lost a bolt.
good thing these guys dont make sleds anymore.
sxviper32
New member
hey, you wouldn't want to trade those ohlins for a pair of brand new fox shocks would you? these shocks haven't even had the weight of the sled on them. let me know if your interested!!! thanks!!!
oldy but a goody of a thread.
ive since gotten rid of that skid and rebuilt the one with ohlins, wow, what a ditch bangin thing, never fades. i ran it with a track extension that works fine with stock wheels but was made too long to use with 8in offset axle. i ran it last year with the stock slow rear axle.
slide blocks were cut 10mm for some transfer and i will say the 136 extended version has less track tension issues as the 121. speed was still off without the axle.
i reinforced the front arm on this one as i found that the arms in front seem to be twisting up, i had two here that were twisted. i straightened one and added another set of bars up the side on the outer sides of the rails. this is what keeps the rails on plane with the frame of the sled so it is very important for this to be stiff as well as tight on the shafts. I used yamaha rear sissor shaft in the top, turned it down a bit to fit stock yamaha rear skid bushings shimmed tight. I also did this to the bottom side and reinforced the inner side of the rail so the lower pipe of the front arm wont cut into the rail.
i used mono skid idler wheel perches to mount all new wheels on the skid. i used yamaha wheels on it and made sure when i drilled the holes and when i mounted them they were pushed down all the way. this puts them down on the track where they should be. this trick works on the mono skid too.
the skid im using now is a metric which can be just as good as a standard. they use a weird size slide that only fits a skidoo skid. I am cheap, very cheap, so, i took a grinder and took about 1/32 off each side of the rail and smoothed them up so i could install standard yamaha slides on it.
what else have others found that are screwed up with these skids, i have a love hate with them. i wont give it up though. ill just keep fixing the hates
03viperguy
Moderator
lol, saw the thread alert in my mailbox and thought.. "I don't remember replying to that..."  how did you find this thread to reply????
 how did you find this thread to reply????


