igolf
New member
Please don't mind the dust (it was uncovered in the garage all summer!) or the tear in the seat (it's old and used!).
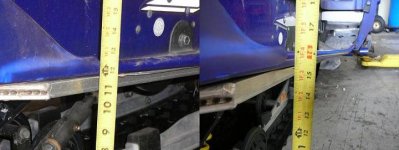
Before and after pics of an M-10 suspension installation.
Can't wait to test it out!
Before and after pics of an M-10 suspension installation.
Can't wait to test it out!
Attachments

DeviantSRX
New member
I've been dreamin about putin an M10 in my '01 as well. Probably wont happen for a while unless I stumble upon a sweet deal. Anyway, how hard was the swap? Did it just bolt in or are some mods necessary?
You'll have to update this thread once you get her out and let us know how she handles. I'm definately curious and want to hear more about it.....
You'll have to update this thread once you get her out and let us know how she handles. I'm definately curious and want to hear more about it.....
igolf
New member
The swap out wasn't too bad because we did it on a two-point car lift. Would not have wanted to do it laying on the floor!
No, it's more than just bolting it in. There is some grinding that needs to be done. Need to grind off a bunch of rivets and parts of the old tunnel brackets. Then install a new tunnel plate with new rivets. New holes for connecting the suspension to the sled. Overall, not too bad actually.
No, it's more than just bolting it in. There is some grinding that needs to be done. Need to grind off a bunch of rivets and parts of the old tunnel brackets. Then install a new tunnel plate with new rivets. New holes for connecting the suspension to the sled. Overall, not too bad actually.
DeviantSRX
New member
Yeah I bet the lift was a definate plus. That dosent sound too bad as long as the all the rivets dont start to spin. How long would you say it took to get it finished?
igolf
New member
It took maybe 4 hours. No problem with the rivets. Just grind off the back side and punch them out.
Mahoney
New member
What did, are u going to do with the front suspension? 
DeviantSRX
New member
I was curious about that as well. I noticed the height difference from the pics and was wondering if you had plans for the front. You can't just leave it that way can you?
NY AttakGT
VIP Member
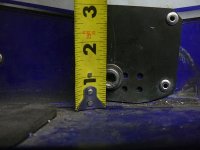
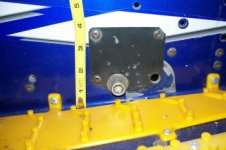
If you could do me a favor igolf....snap a pic of the mounting bolt for the rear torque arm in the tunnel (the 3/8" allen head bolt) and how far is the center of the bolt away from your running board. I put an M-10 in my SRX a few years back and was always curious if I mounted my rear mounting point too low in the tunnel.
PS. I also added two exterior tunnel support brackets approx 3"x6") up front for the front torque arms (mounted under the the two 9/16's bolts) as my tunnel started to crack after a while on both sides. I used the same gauge galvanized steel as the rear enforcement bracket that came with the M-10. Just a thought, FWIW.
PSS. I did not do anything to the front in mine and it has been fine. I did flip around my front shock mount brackets though, in which gained me about an inch of ground clearance. FAST used to offer a BLT (long travel front kit) but they do not make it anymore. You can put Viper shocks up front, but from what I've heard you also have to change the entire front end (trailing arms, radius rods, etc...) because the SRX front suspension does not have enough drop-out to accomodate the Viper front shocks.
--Steve (O.C.)
Last edited:
igolf
New member
NY AttakGT I will try to get that pic for you tomorrow. I'm planning on wrapping things up tomorrow.
Mahoney and DeviantSRX, I've been wondering the same thing! LOL Any recommendations? What have other people done? I figured I would give it a test drive before messing with it.
Mahoney and DeviantSRX, I've been wondering the same thing! LOL Any recommendations? What have other people done? I figured I would give it a test drive before messing with it.
I have been running an M-10 for a couple of years and is the reason I still have my sled. IMO it is the best modification I have made to my sled. To address the front end issue I put shock rod extensions on my Ohlins. Advant-edge motorsports made a 5/8" rod extension that gives about 1 " extra travel when on the sled. I also found that setting up the rear for the correct amount of sag had a huge effect on the handling. Really noticed this the first time I set my sled up for a high milage trip. I set-up my rear to compensate for the extra weight of my baggage. I went a little too far (stiff) and as result ride height was too high and big difference. If I remember correct, I run about 3-4" of sag in my sled,which basically levels it out when I get on.
I found a Sno-Tek wide front end kit with Works shocks on E-bay last sping, I plan on installing in the next few weeks. This will widen and lift the front.
Another adjustment worth doing,IMO,is shaving the back edge of the coupler block, This will allow the block to slide farther before contacting the rear stop. This allows the skid to "squat" more before the skid begins to couple. I can't remember exactly how much I shaved off but I think it was 1/8" to 3/16",it's been a few years. I bought a second set to have incase I went too far but never needed. I would start with an 1/16" at a time and do your best to keep them square and both sides equal. IMO the transfer you'll gain is well worth the loss of ride quality. The lighter you are the less you'll notice the ride quality difference. And one more thing, these skids don't like track tensioned too tight. I have learned to run mine as loose as I can without ratcheting.
Last edited:
igolf
New member
Here you go NY AttakGT. Both sides are identical. I would say just under an inch to the center of the bolt. Could you do me a favor and take a picture of what you changed on the front shock bracket?
vmaxx4, if your sled was off the ground how much do you think your track would hang below your slides? I set mine up tonight to the point where it was hanging around 1 1/4 inches. I noticed tonight that my slides will not fit out through the holes in my track so I definitely don't want to have to change my slides anytime soon!! With my old suspension is was best to run the track as loose as possible also. 1 1/4 inches looked like a good starting point to me.
vmaxx4, if your sled was off the ground how much do you think your track would hang below your slides? I set mine up tonight to the point where it was hanging around 1 1/4 inches. I noticed tonight that my slides will not fit out through the holes in my track so I definitely don't want to have to change my slides anytime soon!! With my old suspension is was best to run the track as loose as possible also. 1 1/4 inches looked like a good starting point to me.
Attachments
yam_apex91469
New member
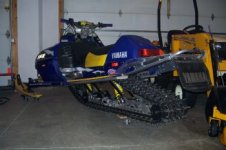
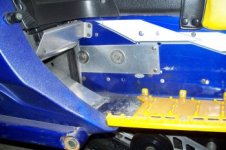
NY AttakGT - i had the same problem with the front torque arm tearing thru the tunnel. I reinforced with 1/8" aluminum and no problems since. I've been following you and igolf's conversation and thought I'd throw a pic of my install. I also ran with the stock front end until last year - i simply added some drop down brackets to the top shock mounts (maybe dropped 1" or so)
I also run my track as loose as possible. I have no-slip drivers and run 2"-3" of sag. This also helps save on the hyfax
I also run my track as loose as possible. I have no-slip drivers and run 2"-3" of sag. This also helps save on the hyfax
Attachments
Last edited:
igolf
New member
bump......................................
igolf said:vmaxx4, if your sled was off the ground how much do you think your track would hang below your slides? I set mine up tonight to the point where it was hanging around 1 1/4 inches. I noticed tonight that my slides will not fit out through the holes in my track so I definitely don't want to have to change my slides anytime soon!! With my old suspension is was best to run the track as loose as possible also. 1 1/4 inches looked like a good starting point to me.
I think about 1 " would be right. I've never actually measured, have just gotten used to looking at it over the past few years. My rear shaft bolt measures 1-1/4" to center from the running board. I always remove the skid to change sliders. This is the easiest skid I have ever removed/installed. The trick is to remove the upper bolts for the shocks to collapse the arms. Then once the skid is bolted into the tunnel, lift up on the rails with a floor jack and line the shock mounts up and insert the bolts, front first then back. I received a video from fast when I initially purchased the installation kit for the M-10, I think it said to unbolt the rear shock only but I do both.
yam_apex91469
New member
removing the skid to change sliders seems like alot of work. I use a slide hammer with a screw on the end to pull off the old slide and a plastic dead blow hammer to put them back on - right thru the track windows. It folds the edge of the window over a little but pops right back when you're done. The hardest part is lining up the darn set screw hole. Put a little grease on the inside of the slider prior to install will help for the next removal. The whole job only takes about 1/2 hour and a couple of beers.
DeviantSRX
New member
I just changed the Sliders out of my 01 srx and I kinda stumbled on a pretty easy way to get mine off. (they fit through the windows on my track though)
I loosened my track up a bit and took a pair of channel locks to the lip of the old sliders toward the rear of the sled, bending the lip back enough untill I could actually see the bottom of my rails. Then I took a rubber coated pry bar (pretty handy when you dont want to gouge the aluminum) and popped the inside lip of the slider off the rail as well. Then rotated the track backwards (reverse) until the ends that I popped off came through one of the windows. After that I just spun the track forward by hand and it took off the old sliders for me.
Putting them back on I did the same as yam_apex and used a dead blow to put the new ones on. This took me about 45 min and two or three Crown n cokes
The key here is to just be careful when popping the old sliders off not to mess up the rails. Like I said have a rubber coated prybar and that worked great but you have to be careful with the channel locks as well.
yam_apex91469
New member
used to use the pry bar/screwdriver method but i found that i was filing the rails to smoot out the knicks I accidentally made from the pry bars. The slidehammer was free (my brother-in-law's) so I tried it. I was skeptical - thought the screw would just pull out of the slide. Was I wrong - worked like a dream
srv540
Member
do you know what Sno-tek kit you got??? there was 2 versions "trail King 42" and "Ultimate 44" the 42 was 9.5" of front travel and the 44 was 10.5" of travel. Sno-tek also recomended using SLP tri-keels skis with these kits.
vmaxx4 said:I have been running an M-10 for a couple of years and is the reason I still have my sled. IMO it is the best modification I have made to my sled. To address the front end issue I put shock rod extensions on my Ohlins. Advant-edge motorsports made a 5/8" rod extension that gives about 1 " extra travel when on the sled. I also found that setting up the rear for the correct amount of sag had a huge effect on the handling. Really noticed this the first time I set my sled up for a high milage trip. I set-up my rear to compensate for the extra weight of my baggage. I went a little too far (stiff) and as result ride height was too high and big difference. If I remember correct, I run about 3-4" of sag in my sled,which basically levels it out when I get on.
I found a Sno-Tek wide front end kit with Works shocks on E-bay last sping, I plan on installing in the next few weeks. This will widen and lift the front.
Another adjustment worth doing,IMO,is shaving the back edge of the coupler block, This will allow the block to slide farther before contacting the rear stop. This allows the skid to "squat" more before the skid begins to couple. I can't remember exactly how much I shaved off but I think it was 1/8" to 3/16",it's been a few years. I bought a second set to have incase I went too far but never needed. I would start with an 1/16" at a time and do your best to keep them square and both sides equal. IMO the transfer you'll gain is well worth the loss of ride quality. The lighter you are the less you'll notice the ride quality difference. And one more thing, these skids don't like track tensioned too tight. I have learned to run mine as loose as I can without ratcheting.
srv540 said:do you know what Sno-tek kit you got??? there was 2 versions "trail King 42" and "Ultimate 44" the 42 was 9.5" of front travel and the 44 was 10.5" of travel. Sno-tek also recomended using SLP tri-keels skis with these kits.
The kit was from a dealer that had stripped it off a "banged-up" sled. No documentation came with it but I'm pretty sure it's a Sno-tek kit. The Works shocks are 16" center to center, and I also got the "power crank" with the two tie -rods and spindle arms. I only received 3 radius rods (16.5") and one of those is bent, so I'll have to source a couple of replacements. The light weight spindles were a separate auction and I was out bid. Never did see the trailing arms go up for bid. I'm going to cut mine and install a hiem joint at the rear.
srv540
Member
if you need I can scan and send you the info from the 1998 sno-tek Catalogue it aint much but it some info