axapowell
New member
So, with all of the threads on "How To" get a place to supply 12v DC to any accessory, how about if you just install a battery on a non ER Viper?
Is the wiring already there for one? How hard could this be?
Perfect power point to run GPS's, iPods, Charge Phones, ect...
Any thoughts? Would it also help regulate the hand and thumb warmers, head and tail lights? Seems pretty easy solution to me.
Dave
Is the wiring already there for one? How hard could this be?
Perfect power point to run GPS's, iPods, Charge Phones, ect...
Any thoughts? Would it also help regulate the hand and thumb warmers, head and tail lights? Seems pretty easy solution to me.
Dave
All you need for reliable 12v dc is a diode interrupting the hot wire from the headlights and a capacitor.
axapowell
New member
No love people? I cannot believe no one has tried this.

axapowell said:No love people? I cannot believe no one has tried this.
Why add the weight of a battery when it isn't needed?
You need to add a fuse box and a wire harness. The battery acts as a smoothing condensor when installed properly, so the smoothing condensers on the non-ER model aren't required but don't hurt anything to leave in place.
Part # 8EK-82105-00-00 is the wire harness
Part # 8EK-82170-00-00 is the fuse box
*** Part # 8FB-82590-00-00 should include both of the above
Part # JT1-83614-00-00 is the fuse box bracket
you may want a few other small parts to finish the job.
On the other hand, for reliable 12VDC up to 30-50 watts, simply use the blue wire out of the Load Control Relay or anywhere downstream such as the wire going to the taillight. This a fairly clean DC supply due to the smoothing condensers.
Last edited:
axapowell
New member
First of all, I'm not concerned with adding 3-5 pounds of weight. That will not make a difference at all.
Ding, thanks. This will make my decision to add the electric start option even easier. That's what I've decided to do, seeing that the cost of most of the (currently back ordered) items will add up to over half the cost of the electric start kit.
Here's the thing though...The kit is for a 2004-2005 SXVenom. I compared the two parts list from both start kits (discontinued Viper vs. available Venom) and the only difference I can see is the battery box and its cover. I'm hoping that there won't be any real major differences in the design, but I'm sure I can get it to work.
Any pictures of where the battery box mounts and the starter?
Thanks,
Dave
the battery box bolts to the side of the chain case. on my sled these wern't threaded but the bosses are there. I simply threaded them with a 6mm x 1 tap.
The kit should come with a installation guide - unless you buy it used and they don't have the instructions anymore. They are also included in many Tech Update manuals of the right era. I am looking at the 2002 Tech Update right now. I do believe that what I am looking at is posted somewhere on here (maybe the Tech Pages).axapowell said:Any pictures of where the battery box mounts and the starter?
Thanks,
Dave
Most that I have seen mount the battery case to the the 2 bosses on the chaincase cover.
I now see Exciter89 already answered that . . .
axapowell
New member
I am getting a new kit, but like I said, it's made for the SX Venom. I think if I have to drill and tap the bosses, the difference in the battery box should be a non-issue. I'll see when the kit arrives.
Anything else I should know?
Thanks for the help everyone, I'll post some pics of the install when it's done.
Dave
Anything else I should know?
Thanks for the help everyone, I'll post some pics of the install when it's done.
Dave

super1c
Super Moderator
Been down the e start road with all three of my sleds. Looks like you already ordered new. You can find one used for at most $200 shipped complete. Look here and that other place i will not name. They are very easy to mount. Heres a link of what i did. If your looking for the fuse box new good luck. Not even sure it comes in the kits anymore? CCC
http://www.totallyamaha.net/forums/showthread.php?t=73120&highlight=viper+electric+start
http://www.totallyamaha.net/forums/showthread.php?t=73120&highlight=viper+electric+start
The bosses on the chaincase are already drilled, just not threaded.
As for the fuse box, the part number is still good from yamaha... I ordered one we'll see if one shows up or not. I just got my Estart install all hooked up and working, works great! cant wait to use it in the snow!
As for the fuse box, the part number is still good from yamaha... I ordered one we'll see if one shows up or not. I just got my Estart install all hooked up and working, works great! cant wait to use it in the snow!
axapowell
New member
Awesome! How hard was the install? I know the primary has to come off, so I ordered the puller. Anything else that has to be removed? Where the heck does the starter mount?
Thanks All! TY ROCKS!
Dave
Thanks All! TY ROCKS!
Dave
Install was pretty easy. I did my homework and reasearched it a ton before I did the install. The starter mounts on the front of the engine below the exhause manifold and the left front engine mount. You have to remove the engine mount to get the starter in. Those holes are already threaded on the block. Yes the clutch has to come off to put the ring gear on. Mine popped right off with the puller and a cordless electric impact. Just make sure that you loctite those flywheel bolts and torque them to spec. Also its very important that you let the loctite properly cure for 24 hours at room temp. I just left the clutch in the house over the weekend before reinstalling. And for the lead wire that connects from the relay to the existing wiring on the sled, the connector is behind the right side cowling just below the recoil handle. its hard to see without popping the screws and pulling the cowling back. Then you'll see it right there its the 3 wire connector that goes to nothing but a empty cap. Good luck!
axapowell
New member
All right...Got the clutch off, cleaned (dishwasher hehe), ring gear installed with GREEN Permatex and curing for the next 24-48 hours and the holes taped in the chain case for the battery box, which BTW is the same in the Viper as the New Venom kit.
I have most of the wiring figured out at least where things plug in and where they mount, except the starter relay. Most pictures I have seen show it mounted to the battery box cover, but the battery box itself looks like there is a place to put it as well? Does it matter? And what is the routing for the main power wire to the starter and where do you attach the ground wire?
Brand new kit, no directions...
Thanks in advance guys.
Dave
super1c
Super Moderator
Probably does not matter. On Both my vipers it is mounted on the rubber battery box cover. There are 2 great PDF files in the tech section with pictures from a manual. They apply to the viper and are very good instructions. They are under engine in the tech pages. Groung mounts to motor mount but the insructions will show you exactly where. CCC
axapowell
New member
Thanks, I've read all of the tech info a couple of times. Very helpful, but the pictures of the cable routing and the battery box cover don't really match up with the kit I got from Yamaha.
Could you shoot me a picture of the top of your battery and where the cable goes?
Thanks!
Dave
Could you shoot me a picture of the top of your battery and where the cable goes?
Thanks!
Dave
super1c
Super Moderator
Yea, give me a bit. I shoot some after i eat dinner. CCC
axapowell
New member
Awesome, thanks!
Dave
Dave
super1c
Super Moderator
Pic's
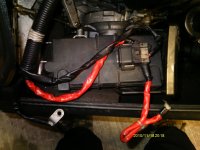
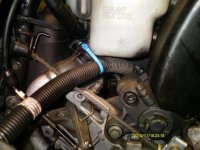
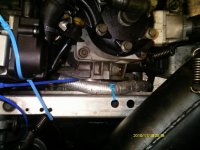
Here ya go! Let me know if you need more or a diff view. I took pics of the main wire harness routing. Used blue zip ties. Also ground is mounted to the mag side front motor mount. Must be grounded to block to i used the bottom bolt on engine side. CCC
Here ya go! Let me know if you need more or a diff view. I took pics of the main wire harness routing. Used blue zip ties. Also ground is mounted to the mag side front motor mount. Must be grounded to block to i used the bottom bolt on engine side. CCC
Attachments
axapowell
New member
CCC,
Thank you so much. That was a big help. And thanks to everyone else who contributed, all of your ideas were most helpful.
So, I got the electric start, gps, new hand warmers, hand guards, track and studs for my summer upgrades.Whew....glad it's all done!
NOW WHERE THE HELL IS THE SNOW????
Dave
Thank you so much. That was a big help. And thanks to everyone else who contributed, all of your ideas were most helpful.
So, I got the electric start, gps, new hand warmers, hand guards, track and studs for my summer upgrades.Whew....glad it's all done!
NOW WHERE THE HELL IS THE SNOW????
Dave