Jack_Shaft
New member
- Joined
- Oct 26, 2004
- Messages
- 13
Hello All,
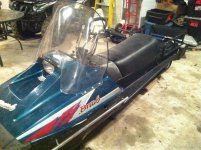
I have an 86 Bravo LT that I am trying to do some maintenance on for the upcoming season. Last year I found that the sled was really boggy and did not seem to have the poll that it used to have down low. I am suspecting that the secondary clutch may not be operating/shifting as smoothly as it used to so I am looking to rebuild it. Also looking to inspect the jackshaft brg as it probably the original.
I have heard a dozen horror stories about removing the secondary in halves and I am trying to avoid that.
I have pulled the primary, removed the chain/sprockets and also the three M8 bolts that hold the jackshaft brg flange in place. What now? I have tried tapping the jackshaft out through the chaincase towards the PTO side, no luck. Do I need to remove the chaincase completely? Seems like the brake disc is holding on pretty tight. I do not want to damage the threads in the end of the jackshaft so I am hesitant to really wail on it.
Advice? The service manual is pretty vague in this area. It mentions a puller for the secondary but I do not have any specific puller for the Bravo secondary.
Macheater
New member
If I understand your post correctly, you are trying to remove the secondary clutch from the shaft? If that is the case you can either get a puller, or do what I do. Get a rubber or plastic mallet and tap on the outside sheave as you rotate the secondary. The clutch can be stubborn but, if you keep tappin it will eventually pop off. There are probably several posts in this section about the same subject. Do a search and you should come up with some good answers to many of your questions.
Last edited:

staggs65
Moderator
Keep us posted on how this works for you. I've got a 89 Bravo for my kids and it's boggy on the bottom too. I didn't mind the first 2 years since they were still learning but my son drove my Phazer pretty good last year so I need to get the Bravo up to snuff for him this year.
Jack_Shaft
New member
- Joined
- Oct 26, 2004
- Messages
- 13
Thank you for some insight Macheater. I certainly did do a search and came up with some vague wording but not much. The problem with the Bravo is that it fits into a number of categories so posts about it are scattered about.
I tried hauling the secondary off today using a steering wheel puller but I could not get a good tug on it. I'll have another look at it on Sunday. Tapping with the rubber mallet did not get it to move.
I tried hauling the secondary off today using a steering wheel puller but I could not get a good tug on it. I'll have another look at it on Sunday. Tapping with the rubber mallet did not get it to move.
Jack_Shaft
New member
- Joined
- Oct 26, 2004
- Messages
- 13
Got the secondary apart yesterday, the key is to use 3 x 1/4"x20 bolts, 2" long. I cannot seem to be able to get the jackshaft to come clear of the brake disc and out through the PTO side of the sled. Seems like the brake disc is holding on very tightly. I will spray it with some penetrating fluid at lunch today and see if I can soak it loose.
The secondary slider blocks looked well worn but not deformed, I have a hard time believing that it was not shifting properly. I will also inspect the primary clutch to see if there were any problems there but I doubt it since it strokes in/out very freely.
I have been told by some people that boggyness can be attributed to a MAG side crank seal starting to fail, however I'm not sure I buy that. I do have to fix the recoil starter as well so I may have my answer before too long once I get into that job.
Jack_Shaft
New member
- Joined
- Oct 26, 2004
- Messages
- 13
Changed secondary slider blocks and had a good look at the jackshaft. The brake disc was indeed seized on the shaft and with some liberal application of penetrating I managed to break it loose. A few more smacks on the chaincase end and the jackshaft popped right out. Of course the helix (LH thread!) needs to be removed BEFORE you pound the shaft out. Use the park brake to hold the jshaft is place and then again proceed to pound the helix off. Mine was practically grown on there. Following the removal of the jshaft, the jshaft brg (6205) can then slide off the end of the shaft and be replaced. The collar and circlip on the inboard side holds it in place behind the helix.
Once that was tackled I got into the drive axle brg and also changed that, pretty basic and nice and easy. Refreshing! That one is a 6004.
Following these two jobs I got into the recoil since it would not retract quickly last season. I disassembled it and could see that the small return spring was broken and the pawl itself was worn quite badly. of course, in my haste to inspect, the rewind spring got away from me. I used to be good at winding these back up but this one gave me trouble. After three tries I called it a night and hopefully I can manage to rewind it tmrw and re-assemble.
I did not see any oil residue near the bottom of the MAG side engine housing and therefore I do not believe that there is a problem there. My driveaxle brg was toast, my jshaft brg was on the way out and my secondary sliders were slightly worn so that may be the culprit. I will perhaps also try to apply a little more tension on the secondary spring during reassembly.
Between the worn clutch buttons, roached bearings and stuck brake disk, you have huge potential for power loss!
Best penetrating oil I've found so far is acetone and ATF mixed 50/50. If you've ever done rusty u-joints with a bench vise, hammer and socket, you would be amazed how well this works. Fast too.
Glad you got everything fixed up!
Best penetrating oil I've found so far is acetone and ATF mixed 50/50. If you've ever done rusty u-joints with a bench vise, hammer and socket, you would be amazed how well this works. Fast too.
Glad you got everything fixed up!
Jack_Shaft
New member
- Joined
- Oct 26, 2004
- Messages
- 13
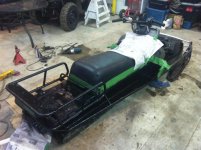
Almost done in the engine bay anyway, need to get at the runningboards and tunnel painting now. That's still going to take a little while.
Jack_Shaft
New member
- Joined
- Oct 26, 2004
- Messages
- 13
Still fooling with recoil spring... GD that bottom bolt is tough to access with the engine still in the sled. Runningboard edges turned out great with 1/2 of a 3/4" ID pipe each side.
Jack_Shaft
New member
- Joined
- Oct 26, 2004
- Messages
- 13
Bought a proper Yamaha recoil srping kit today, well worth the money. The perimeter wire was well smaller than the recoil housing and the spring easily slid in. The Kimpex one I had first was bigger than the housing and was very difficult to install. I swore enough on the two recoil housing bottom bolts that I should probably become a nun now LOL but with enough plumbers goop on my fingers I was able to hold the nut on one finger and tighten the bolt on the other.
Engine bay is all back together now and the runningboards are all reinforced, welded and painted. Looks great, now I have to tackle the rear skid and hood install, no fixing left, just re-assy. Yay!
Engine bay is all back together now and the runningboards are all reinforced, welded and painted. Looks great, now I have to tackle the rear skid and hood install, no fixing left, just re-assy. Yay!
Jack_Shaft
New member
- Joined
- Oct 26, 2004
- Messages
- 13


