Batwolf
Member
XTC 600 twin - and then there was a heart beat
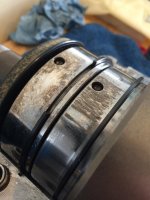
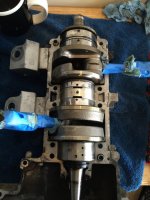
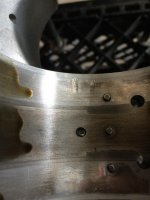
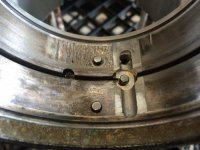
Well I split the case on the ole 600 twin for installing new pto & mag seals to round out a thorough overhaul. Visual inspection of the crank revealed these odd raised scoring marks on top of the inner bearing at the pto side. Of course, on the top half of the case, pto side, corresponding to where the bearing rests, there are negative impressions alike. I don't know much about the motor; I've had the sled for 11 years, bought with 2000 miles and now has a touch over 4k. I've never opened the motor, let alone taken it out. Have a look see at the crank and tell me what you think please. I snapped a few extra pics to hopefully give a good view of what I see.
Also, my tech manual states I'm allowed 0.8-1.0mm of "rod small end freeplay". Now, I have calipers, but I don't have a jig or a steady setup to properly take that measurement, but I honestly feel it's at least 1.0mm. What do you think is the best way for me to proceed?.
Really hope to revive the XTC, so any help you guys can provide is appreciated!
Attachments
Last edited:
Batwolf
Member
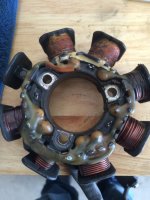


Crank bearing and motor case wear is normal. And as far as the stator I would test it and if its ok I would run it. Make sure and Blue Loctite all nuts and bolts in the engine and torque everything to spec.
I just rebuilt my 600 twin and saw similar wear marks. I only had 2000 miles on my motor and the wear wasn't as much as yours. I thought it was due to the piston coming apart but I guess not.
Batwolf
Member
So does that look like chatter was occurring between the bearing and case? As long as I need not be concerned about it, I'm stoked and ready to get going with reassembly! I ought to have the stator checked shortly after work tomorrow and will start assembly after getting everything cleaned.
Throttle Junkie35
New member
That is usually caused by general high milage, clutch or flywheel out of balance, crank out of true, or sustained high rpm running. Have you ever blown a belt or grenaded a clutch???? I would throw a dial indicator on the ends of the crank to see if its within spec. If it is, scrape the high spots off of the bearings with a razor, smear the bearing surfaces with red loctite or yama bond 4, then re-assemble. Good to go.
Batwolf
Member
Hmm... Good stuff. How do I verify clutch balance? I'll check PTO crank end for trueness. Clutch has never let go as long as I've owned it and if I recall, I think I blew up one belt when I first got it years ago.
Batwolf
Member
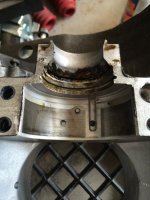
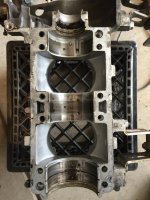
Couple more photos of my crank and the grooves in the bottom of the case. Forgot to post them with the others. It's hard to believe this much scarring happening on PTO side crank bearings and associated surfaces of the case is normal.. It pretty much looks like someone took an engraver to the bearing surfaces on both case halves.

Throttle Junkie35
New member
As long as your clutch doesnt have any sizable nicks and all the bushings and weights are in good shape your good to go. If you blew a belt, there is a good chance you threw the crank out of whack too. I would be very surprised if your crank is actually straight. If you have the tools to straighten it out yourself i would do it. If not, I would find a low milage bottom end. There are some for sale in the classifieds right now.
ahh yes, bearing chatter, common on the vibrating twins. This vibration is also why they (twins0 eat up the clutch rollers and weights with pretty regularly.
You can clean up the cases and the bearing outer races with a flapper wheel on a die grinder or fast drill, just clean it up so its somewhat smooth youll never remove the lows so dont sweat it. clean it with brake clean when done. When you reassemble it use loctite on the bearing races and it will keep that from happening again, i use the green loctitie so if it has to come apart again its easier,. Make sure the outer race of the bearing and the case inserts in the case are not oily and dry(use brake clean and blow dry before assembling), apply loctite and assemble.
You can clean up the cases and the bearing outer races with a flapper wheel on a die grinder or fast drill, just clean it up so its somewhat smooth youll never remove the lows so dont sweat it. clean it with brake clean when done. When you reassemble it use loctite on the bearing races and it will keep that from happening again, i use the green loctitie so if it has to come apart again its easier,. Make sure the outer race of the bearing and the case inserts in the case are not oily and dry(use brake clean and blow dry before assembling), apply loctite and assemble.
Batwolf
Member
You guys know better than I since this is my first sled engine rebuild. I'm relieved to hear you guys reassure me on this. I think for piece of mind I my take on my crank to have it checked n spec'd. It may not need it, but would sure feel good to have that be known. What do you guys think?
So when this puppy goes back together, the proper thing to do is lay just a fine bead or layer of high temp rtv? Enough to create a seal but not so much that it's squish out in/out of the case?
So when this puppy goes back together, the proper thing to do is lay just a fine bead or layer of high temp rtv? Enough to create a seal but not so much that it's squish out in/out of the case?
Throttle Junkie35
New member
Do not use rtv!! It doesnt hold up. You need to use Yamabond 4, Threebond 1194, or Permatex anerobic sealer.
Batwolf
Member
Will do. Thanks for the advice! Guess I would have sealed my engine's fate there if I hadn't asked! Haha, see what I did there?
take your nice clean case half from the top and put it upside down on your bench with a wooden block to hold it level, then take your nice and clean crank with no oil on the outside of the bearing races and apply a little line of loctitie to the outside races(you can also put a little line on the crankcase bearing shell), then lay it in the crankcase top with the rods going down thru the holes, align the bearing pins to correct tab,and then install your half rings to align the crank from left to right. Take the bottom half of your clean case and put a steady layer of yamabond 4 on the half, take your finger and make sure its smeared and lift up and down this will make it stick to the case half good, put a nice even layer on it about a 1/16-1/8" thick on it, then flip it over and install on the top half with your crank sitting in it, tap it with rubber or plastic mallet to seat it, install bolts and torq it down, let it sit and dont wipe off the sealer in between the case halfs, it seals out airleaks, it will semi harden over night or couple days.
Batwolf
Member
Wow.. Went to local napa and carquest to pick up some green loctite.. And neither of them have it, nor do they regularly stock! Aaahhhh!! That's what I get for living in a small mountain town with poorly run, locally owned shops. Now I'm driving 35 miles to an autozone to pick the stuff up.. I guess the silver lining is that I'm driving the work car today to handle some technical tasks with medical equipment due to DST, some I'm get paid too!!")
Batwolf
Member
Can I use yamabond4 in place of th loctite? Turns out the auto zone doesn't have the green stuff either! That's after I called to ask, and the rep said "yea we have that". If not yamabond4, what alternatives do I have?
Throttle Junkie35
New member
Red loctite.
Batwolf
Member
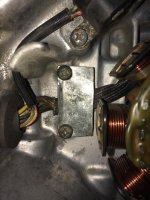
Well, my progress is kinda slow, but it's coming along nicely thanks to your guys' advice. I did screw up one thing.. Although my workspace isn't THAT messy I lost, or rather, I think I accidentally threw away the retaining plate behind the flywheel that hold the stator harness in place. Soooo I just made another one; tell me what you guys think! I'm kinda proud of the little fix. Anyway, case halves are sealed and torqued, new pistons/rings/bearings/pins/clips are in, jugs installed and torqued, head polished installed and torqued, flywheel installed but not yet torqued since I will wait until engine is placed and primary is locked in. I gotta say, its fun doing this project and I cannot wait to hear the ole XTC come to life again!
Attachments
Batwolf
Member
take your nice clean case half from the top and put it upside down on your bench with a wooden block to hold it level, then take your nice and clean crank with no oil on the outside of the bearing races and apply a little line of loctitie to the outside races(you can also put a little line on the crankcase bearing shell), then lay it in the crankcase top with the rods going down thru the holes, align the bearing pins to correct tab,and then install your half rings to align the crank from left to right. Take the bottom half of your clean case and put a steady layer of yamabond 4 on the half, take your finger and make sure its smeared and lift up and down this will make it stick to the case half good, put a nice even layer on it about a 1/16-1/8" thick on it, then flip it over and install on the top half with your crank sitting in it, tap it with rubber or plastic mallet to seat it, install bolts and torq it down, let it sit and dont wipe off the sealer in between the case halfs, it seals out airleaks, it will semi harden over night or couple days.
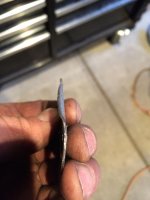
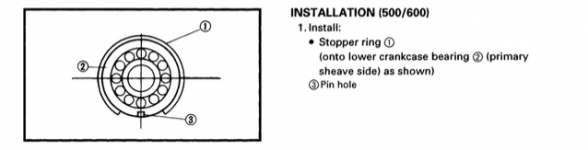
Okay, so in hindsight, I'm really trying to remember what the ring position was during assembly, but I may have overlooked the step shown in this photo.. How important is the clock position of the stopper ring in relation to the pin hole..?
Attachments
Batwolf
Member
Dang, either no one cares about Vmaxs or my thread has the wrong title, ha!