thefullmonte
New member
Hey guys and gals. Just picked up an 88 EX570. Inexpensive project sled I hope to use for some local trail fun. Been around sleds for many years, but this one is a new experience. More of a mountain guy, but can't ride there as much as I would like. Chassis seems to be in fair shape and just needs some TLC. The motor............well mice took care of that. Swapping it this weekend.
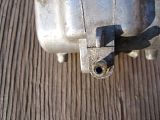
First question. #9 is missing from the below image link. Do most people remove this or should I get a replacement?
I have searched and found the question asked numerous times without an answer. Does anyone have a good known clutch setup for this sled? Or, is the OEM setup pretty good? I'm very capable of doing it myself, but I'm sure someone has figured it out by now.!") I prefer a smooth engagement and quick acceleration. Don't really care about top speed. And yes I will be putting in a 16T sprocket. Can't believe I found that I still have 2 of them. Lol
I prefer a smooth engagement and quick acceleration. Don't really care about top speed. And yes I will be putting in a 16T sprocket. Can't believe I found that I still have 2 of them. Lol
My research tells me that the jetting on these was somewhat of a disaster. I will make sure the Power jet is disabled. I'm open to any and all advice. I'm also going to modify the air box. Looks like a poor design even for then. Say what you will, but I think I can get it to run more consistently. If they only knew then what they know now, right? I will post pics when I"m done.
Any other tricks or tips on these sleds. I'm interested in anything....cooling, suspension, jetting or whatever you have found to work. I don't know why, but I'm sure having fun wrenching on this sled. Brings back memories of my old Phazers I guess. Thanks in advance for any help you can give.
http://www.yamahapartshouse.com/#/Y..._SNOWMOBILE)/INSTRUMENT_PANEL_(EX570M_-_1988)
First question. #9 is missing from the below image link. Do most people remove this or should I get a replacement?
I have searched and found the question asked numerous times without an answer. Does anyone have a good known clutch setup for this sled? Or, is the OEM setup pretty good? I'm very capable of doing it myself, but I'm sure someone has figured it out by now.
I prefer a smooth engagement and quick acceleration. Don't really care about top speed. And yes I will be putting in a 16T sprocket. Can't believe I found that I still have 2 of them. LolMy research tells me that the jetting on these was somewhat of a disaster. I will make sure the Power jet is disabled. I'm open to any and all advice. I'm also going to modify the air box. Looks like a poor design even for then. Say what you will, but I think I can get it to run more consistently. If they only knew then what they know now, right? I will post pics when I"m done.
Any other tricks or tips on these sleds. I'm interested in anything....cooling, suspension, jetting or whatever you have found to work. I don't know why, but I'm sure having fun wrenching on this sled. Brings back memories of my old Phazers I guess. Thanks in advance for any help you can give.
http://www.yamahapartshouse.com/#/Y..._SNOWMOBILE)/INSTRUMENT_PANEL_(EX570M_-_1988)
Last edited:
1. Clean up among all the funky fuel and oil lines that Yamaha put on these sleds.thefullmonte said:Just picked up an EX-570 ( 1988 ).
My research tells me that the jetting on these was somewhat of a disaster.
I will make sure the Power jet is disabled.
I'm open to any and all advice.
I'm also going to modify the air box.
Looks like a poor design even for then.
Say what you will, but I think I can get it to run more consistently.
Any other tricks or tips on these sleds.
I'm interested in anything.... cooling, suspension, jetting or whatever you have found to work.
Delete the whole Oil Injection system including the oil pump.
Run 1:40 premix instead.
2. Completly disconnect the warming system to the carburettors.
3. Disconnect the T.O.R.S.-system from the carburettors.
remove the powerjet function and parts from the carburretors.
4. Jetting: Factory updated jetting for the Yamaha Exciter-I ( 87 / 88 / 89 )
Pilot jet : 40
Main jet : 320
Air screw : 1.0 turn out ( +-½ Turn )
Slide : 3.0
Needle jet : 480 P-6
Needle : 6FL68 ( Yamaha part # 239-14116-68-00 )
( And of course all the things regarding the "Power Jet" system is deleted ! )
5. Set the engine idle speed to 1600 Rpm
6. Seconary clutch:
Secondary spring : WHITE
Secondary setting : A-2
Helix angle : 45 Degr.
Helix pre tension : 50 degr.
.
Last edited:
thefullmonte
New member
Thank you for the input. I'm still waiting for a guy to come through on a motor. Mine does look like it could be salvaged now that I got both cylinders off. I think the crank rebuild would get expensive though. I may tackle that next summer and hopefully throw in this used motor for this season.
Has anyone tried any different clutch springs or weights? Looks like a phazer runs a more aggressive spring than the exciter and those have to run lighter weights.
Has anyone tried any different clutch springs or weights? Looks like a phazer runs a more aggressive spring than the exciter and those have to run lighter weights.
thefullmonte
New member
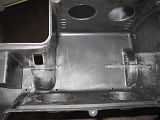
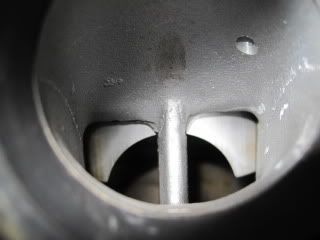
Just wasn't feeling those air walls in there. At all. Lol Love my dremel. I can grasp air horns and round baffles like other sleds, but a wall blocking 2/3 of the intake opening wasn't sitting right with me. I'm sure it worked fine, but I suspect this will drastically increase intake velocity. If it doesn't work I have another air box.
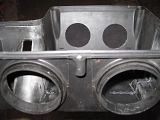
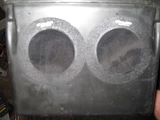
My thought is this will pull cooler air from the cavity between the tank and not be as effected when the upper intake is full of snow. I am planning on running the air shelf installed to feed the front opening with cool air as well. Frogskin makes a real nice intake cover that I used on all the holes. A rectangle for the front and two circles on the back. Not a fan of unfiltered intake air. This is a waterproof filter material that flows good air with vacuum (intake).
Inserted a set screw in the old power jet location to seal it.
Tapped the nozzle to the length of a set screw to bottom it and make a good seal. So I have a set screw in the bowl and the outlet. By by hose and bearing.
Picked up the motor and parts sled on Sunday. Started a track swap that I wasn't planning.
The motor looks good! Unexpected Wiseco pistons with the SX cut.  :rolleyes:") I'm really having a lot of fun with this project and will continue to update as I go.
I'm really having a lot of fun with this project and will continue to update as I go.thefullmonte
New member
I wanted to add that the new motor also had the bender direct oil injection installed. After much research and deliberation with myself I got rid of it. My thought is that the oil will mix better with the fuel plus I wasn't looking forward to the jetting issues this seems to cause.
Hypothetically you could throw out all your jetting and start over. Including jet needle and needle jet, pilot jet, etc. You are completely changing the fuel requirement of the carbs with the lack of oil in the line. Just my thought on it I guess.
Your oil flow is completely dictated by what position the oil pump is in. Direct injection will still flow the same amount of oil, but maybe get it in the motor just a little sooner than the oil being mixed in the fuel line. I just don't see a problem with how Yamaha was doing it with their autolube system.
Wiseco "SX"

Post a couple of hi resolution big pictures of the Wiseco SX pistons !!thefullmonte said:Picked up the motor and parts sled on Sunday.
The motor looks good !
Unexpected Wiseco pistons with the SX cut.
I'm really having a lot of fun with this project.
speednutt
New member
Happy to hear that your little project is coming together. Glad your able to make use of the track. If only i could have got it out of there in time. LOL
Thanks again.
Thanks again.
thefullmonte
New member
Thank you! Pleasure doing business and I'm glad we were able to make it work. The motor cleaned up very nicely. Trying to get the skis off to get the bushings free. Then I can check ski alignment and get the motor back in. Haven't even looked at the rear suspension again. I'm dreading all the rusted shafts. And you were right about the Yamaha drive shafts being a bugger. It didn't take long for me to get out the grinder and split those collars. Just ordered a new on. I think It was 12$ or so.
Lasse, I will take some pics this weekend. Might be hard to see as the motor is all together. Are you looking for measurements? They were very easy to spot with the large cut out on the intake side. Stock pistons are obviously straight across the bottom edge. I will be curious what they do to the stock jetting. If anyone has input I'm listening.
Lasse, I will take some pics this weekend. Might be hard to see as the motor is all together. Are you looking for measurements? They were very easy to spot with the large cut out on the intake side. Stock pistons are obviously straight across the bottom edge. I will be curious what they do to the stock jetting. If anyone has input I'm listening.
thefullmonte
New member
Here is a picture of the piston. Sorry I took so long, but I hope that helps.
I have also since re installed the direct oil injection per the recommendation of a trusted friend and a very knowledgeable mechanic.
All of the sponges have been removed from the hood and clutch side panel. I replaced them with heat tape where necessary and repaired the existing heat shields on the exhaust side.
Also came across some old Yamaha bumper stickers stashed away in the bottom of my tool chest. Classic.
Lolthefullmonte
New member
Does anyone know what machine uses longer throttle cables? I thought I read somewhere that maybe an Exciter ST or something. I can't seem to find it anywhere.
I just added a 3" powermadd universal pivoting riser. Everything else fits perfectly except the throttle cable could use just an inch more.
Thanks for any help.
I just added a 3" powermadd universal pivoting riser. Everything else fits perfectly except the throttle cable could use just an inch more.
Thanks for any help.
exciter sx flatslides and 95 vmax 500 clutches( has wider rollers)and psi pipe will wake up your exciter,
thefullmonte
New member
Thanks for the advice. I have a PSI pipe, but I think I'm going to sell it and just stick with stock. I might be getting old. Not sure how that happened. Lol I just can't take that noise anymore. I think I gave myself some hearing damage last winter. Certainly don't want to make it worse. Different clutches and carbs will likely have to wait for next year.
Parts Unlimited has some universal throttle cables for the 38mm carbs that are 37" long. Should be the ticket and only $13. Item # 923. I will let you know for sure in a couple of days how they work.
So officially you can only go 2" rise without changing cables.
3" rise, the brake cable, oil cable and all wiring are long enough but you must change out the throttle cable. Again, I am using a Powermadd Univ pivot riser 3". This allows me to roll the bars forward which also gives more cable. I will get some pictures, but I did mount the fairing to the riser which did of course pivot it forward as well. Changed the look a little, but I wanted to maintain some coverage for my hands. Also makes the gauges easily readable from a standing position. Otherwise it could have also stayed in the original position.
Any taller than 3" and you will have to change the brake cable as well. Electrical wiring could probably go another inch if needed.
One drawback I found was with my cable routing the cold air intake doesn't seem feasible. Quite frankly, It doesn't look like it fit in there too easily to start with. Kinda disappointing as I really didn't want to draw air from under the hood. However, I think my riding comfort takes priority.
dsc577
VIP Member
i got a 2 in riser to work with the cold air kit by notching the back of the top cover and and the front of the scoop,runnin the cables straight threw
thefullmonte
New member
I saw in another post that you had done that. I may still do that, but I'm going to wait and see what the new cables do for me. Might give me enough slack to make it work.
I spent the day trying to figure out what to do about a rear suspension. Just FYI to everyone. A 87 has a different rear suspension and also different TSS shafts and ski mounts then 88,89. The front torque arm and shock mount are different. the TSS is narrower at the bottom to accept a different saddle.
I have 3 front torque arms that all need to be welded. 3 sets of rails that at one time or another each person wore the hifax completely through. UHG
Trying to figure out what is causing the torque arms to break. 3 sets tell me it is something in the design.
dsc577
VIP Member
ya, the 89 90 rear suspension has a shorter rear shock too,when the skid gets airborne the rear pivot arm can go over center causing the shock to hit the inner wheels.happened to my 89 and 90,no problems with 88.broke the front swing arm in both my 88 and 90,and also my 2000,they all break.
thefullmonte
New member
Back to the drawing board on the cables. These are the screw in type and when attached to the carb tops on the Yamaha carbs it doesn't allow for adjustment. Nor do these have enough slack for the Yamaha throttle block assembly. I suspect these would work good for Polaris. I tried  Lol
Lol
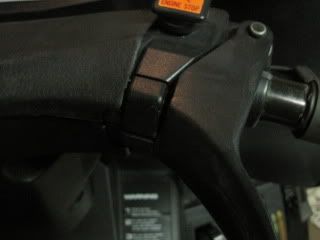
Here are some pics of the riser and the tilt of the fairing.
Lol Here are some pics of the riser and the tilt of the fairing.
Last edited:
thefullmonte
New member
Well, I did hours of searching for a better cable option and turned up zilch. Most Mikuni carburetors use a top with a screw in type of adjuster. Yamaha must have had something made proprietary to them with their 38's. The adjuster slides in and is held on with a C clip.
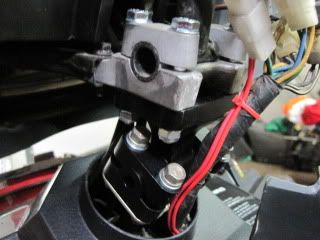
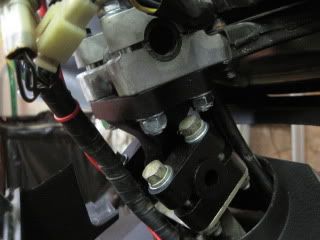
So, had to come up with a solution. Wasn't going to spend more $. The powermadd extension wasn't a good solution since I needed 1" and not 10". I loosened up the pivots once more to see what it would take to get the slack I needed. I also loosened up the throttle block and moved it as far inwards as it would go. Here is what happened. And I know it's ugly, but very functional. So, at least for now I will live with it. Enjoy.
Here I moved the throttle block inwards. Still plenty of reach and is not uncomfortable. I did get out the dremel and do some work on the covers. They normally don't slide over the edge of the block, but I wanted it to look clean.
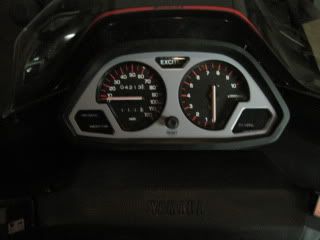
Here is from the standing position. Tilting the bars gave a view of the gauges that even modern sleds would envy. The bar angle became even more desirable.
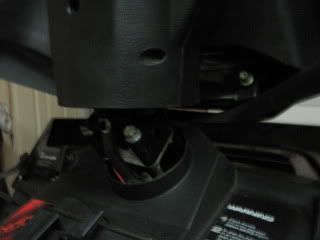
Clean, but you can see how much rise I achieved.
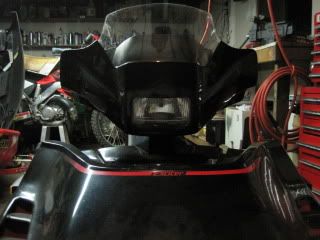
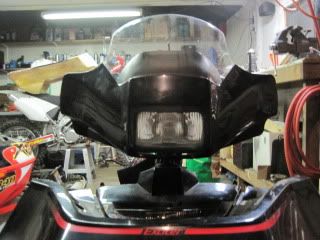
And the bad news. The fairing turned really fugly from the front. Headlight is adjusted as far upwards as it will go. I'm hoping it will be enough. So the good news is the stock cables should work. The bad news is it required a fair amount of "making it work". And of course the fairing is sorta.........not as cool as it once was.
So, had to come up with a solution. Wasn't going to spend more $. The powermadd extension wasn't a good solution since I needed 1" and not 10". I loosened up the pivots once more to see what it would take to get the slack I needed. I also loosened up the throttle block and moved it as far inwards as it would go. Here is what happened. And I know it's ugly, but very functional. So, at least for now I will live with it. Enjoy.
Here I moved the throttle block inwards. Still plenty of reach and is not uncomfortable. I did get out the dremel and do some work on the covers. They normally don't slide over the edge of the block, but I wanted it to look clean.
Here is from the standing position. Tilting the bars gave a view of the gauges that even modern sleds would envy. The bar angle became even more desirable.
Clean, but you can see how much rise I achieved.
And the bad news. The fairing turned really fugly from the front. Headlight is adjusted as far upwards as it will go. I'm hoping it will be enough. So the good news is the stock cables should work. The bad news is it required a fair amount of "making it work". And of course the fairing is sorta.........not as cool as it once was.
thefullmonte
New member
I want to add that with the the further forward bar angle it also creates a more rider forward position. I think this will help the handling of the sled. Especially since I'm a stand up kinda guy anyway. I've had people tell me they are just going to remove my seat since I never use it anyway. 
stanage
Member
Everything is possible.
Hey Man, good work! I'm seriously thinking of putting risers on mine, but I want to be sure of what I need before I start.
Check this mad fool! 18 risers on his exciter!! He found a way to extend his throttle cable atleast that much!
http://www.hardcoresledder.com/forums/358-mountain-sleds/521639-my-1988-exciter-mhc.html
dsc577
VIP Member
oh man cant stop laughin,(mad fool describes it)what ever happened to him?i wanted to hear how the track worked,oh well.i really like the pivot adapter,good work