YooperWoods
New member
Found this on the Milwalkee C/L.
https://milwaukee.craigslist.org/snw/4687261568.html
Oooh that is tempting, would love to have it. I have a customer who used to ride Phazers back in the 80's. They built them into mountain sleds more or less back then and boon docked all over the UP. He was in my shop yesterday and said he has a ton of parts still and I could have them. He's going to bring them in today so I'm waiting to see what he's got. Never know could be a pipe in the box.
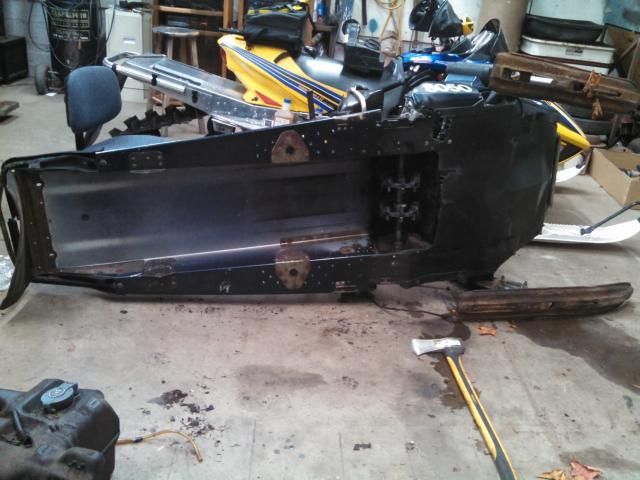
So I got it torn down last night. The right side piston and jug look great, which doesn't surprise me since it had 140 psi compression. Need to order a gasket kit and rings(hoping there in the box too) to get the motor back together.
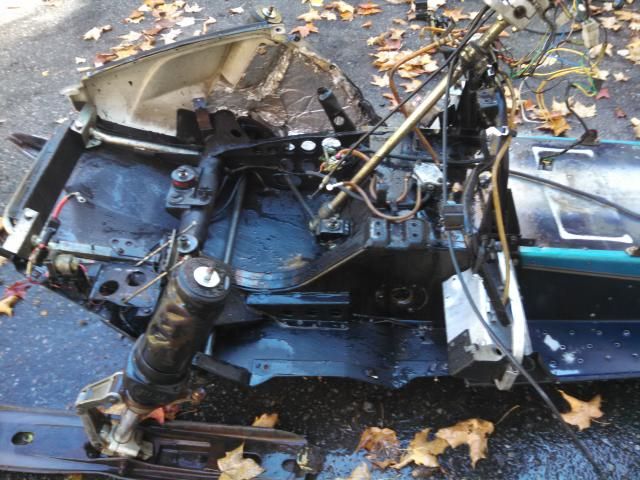
Found a couple things under the left footwell. One is a ceramic resistor and the other is a small metal box something electrical. wires are broke to each up top and I don't see where they go to. Anyone know what these are for? Kinda of hard to tell in this pic, there's lots of grime down there I missed when I power washed it.


Voltage regulator and the resistor is most likely for the hand warmers if they were an aftermarket add on
YooperWoods
New member
No idea where that voltage regulator wires into. Can't find any place where wires were torn or cut out of or where it might go. Going to have to find a service manual or at least get a wiring diagram.
Waiting on gaskets and rings now. Decided to give it a hone and re-ring it while it's apart. Think I'm going to pull the motor also, split the cases and install new crank seals since I've gone this far and they're included in the gasket kit so might as well put them in.
Ordered 3" angled risers for the bars too. Definitely have to go up and forwards with them to ride off trail.

YooperWoods
New member
I bought a service manual download and have the wiring figured out, what I can't figure out is why they did what they did. The voltage regulator was simply eliminated, it was removed from the wiring harness where it taps into the yellow coming from the magneto to the blue wires going out the all the lights and bulbs.
The hand warmer resistor is even more bizarre. the yellow/blue wire from the hand warmer switch should run to the resistor and then the black to ground(black wires in the harness are all grounds). Instead they disconnected the resistor and ran the yellow/blue from the switch direct to magneto output, the same yellow where it connects to the blue wires and where the voltage regulator was removed from. Makes no sense, unless this was some kind of mod to get more heat to the hand warmers.
The big shrink wrap in the middle of the pic with two blues and a yellow wire running into had me fooled. At first it looked factory, until I saw the crummy soldering job inside of it. This is what has to come apart and get rewired correctly.
Wiring hack jobs are the worst imho. I'd rather fix a broken primary than try to sort out someones butchered up wiring.
Hope you guys don't mind me rambling on as I go through this sled. It's a way for me to document my work and keeps me motivated and on track.


YooperWoods
New member
YooperWoods
New member
A couple of bucks
VIP Member
Looks like SH!T.
A couple of bucks
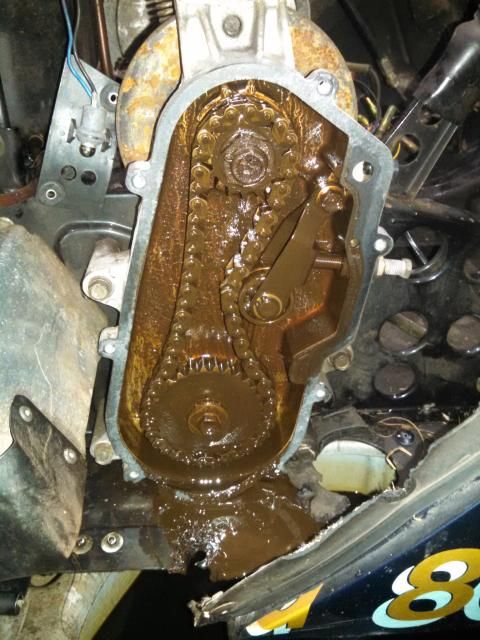
VIP Member
Time to get a can of brake clean and a new chain.
YooperWoods
New member
Yep that's exactly what I thought lol.Looks like SH!T.
I have another chaincase, gears and chain in perfect condition. That ones getting flushed.
A couple of bucks
VIP Member
After thinking about it, I'd probably pull the back 1/2 of the chain case and replace the 2 6205 bearings & the 1 6301 tensioner bearing.
http://pages.ebay.com/link/?nav=item.view&alt=web&id=261439184016
http://pages.ebay.com/link/?nav=item.view&alt=web&id=261439184016
YooperWoods
New member
YooperWoods
New member
Hey Snowdad just wanted to bump this up cause I think I've found 7t non extros. Google Yamaha 8E3-47531-00-00 or look here - http://www.ebay.com/itm/Yamaha-Enticer-340-1989-1990-1991-1992-Track-Drive-Sprocket-the 2" track along with the extros make it damn near impossible to get the drive shaft back in. it simply does not clear the bulkhead without beating, prying, using hydraulics, etc.
once you get it in, if you get that far, you will see you lack clearance. yes, it will work, but is inefficient as can be for evacuating snow. its a power robber for sure. the install will be easier if you can find non-extro drivers in 7t. i havent checked for awhile but the last project i couldnt find any is why i went extros.
that 1.25 will be a vast improvement, or cut down the 2". in your shoes, i would shove that 2" up in there and you will see what i am referring to. then cut about 1/4 to 3/8 off the lugs and have fun. i have done several and that 1.5+ lug works best in my experience.
I still prefer extros but unless I find some used ones they're pricey for this old beater.
YooperWoods
New member
Got the bar risers on, sort of, still have to drill out the weld nuts on the steering stem. Brings them up 3" and moves them forward. Can stand on the sled and hold bars without bending over now.
Have pretty much decided to make this sled as light as possible. Deleting electric start and battery, faring and stock light, oil tank and pump and whatever else I can strip. Will put an LED light bar on it and going to run premix(I think, haven't fully decided that yet).


Have pretty much decided to make this sled as light as possible. Deleting electric start and battery, faring and stock light, oil tank and pump and whatever else I can strip. Will put an LED light bar on it and going to run premix(I think, haven't fully decided that yet).


Yamaha Nutz
New member
looking like you got a project sled does not look too bad the regulator and grip resistor are in the stock place a blown belt will do the damage that you see and the resistor is stock not a add on .........if you want more gearing options you can go to the 90 and older jackshaft and drive shaft to run the triple wide gears ..........
YooperWoods
New member
You are dead on about a blown belt. When I cleaned it out there was some chunks of belt stuck down at the footwell.
Did some measuring in the tunnel last night. Going to be able to run the full 2" track I have with 7t sprockets. There is only 1 spot where it's tight, that's the relief for the steering linkage which protrudes into the tunnel a 1/4 inch. The track I have is from a Ski Doo Summit and the middle lugs are only 1 3/4" tall for about a 3 1/2" section down the middle so it will clear that raised spot. Lugs on each side are 2".
The layout for my skid mounting points looks good too. The front hole actually lines up, although I'm still going to have to move it back since it's going from 10t drivers to 7t. The back hole is surprisingly going to be just forward of the existing rear mount.


YooperWoods
New member
To extro or not to extro, that is my question. I don't want to have a problem with ratcheting or have to run the track tight and gobble up power. But if I run extros I'll have to cut the rest of the windows out of this track, every third one is closed, and then would I have to fully clip it? Getting extros and this track in place will be a struggle I can see that. Hmmmm
do the extros, you will be much happier if you keep that sled around. no need to clip the track. done several that way and out here i have never seen a problem.
windows are defined. i have found the quickest method is to invest in two chisels. one for the width and one for the length. lay the track over a 2x or 4x and punch away. you can clean the corners if needed with a razor knife and then burn the edges with your torch. i have had a few "track punches" made to duplicate the window sizes but have gone back to the double chisel theory simply due to the varying window sizes between track brands.
double check your ebay link. i read that as one only. didnt look to see if a pair was available, but they will work in pairs.
YooperWoods
New member
Thanks Snowdad, I value your opinion since you've done this before so went ahead and ordered the extros. Cycleplicity had them for $66.95 which isn't too bad.
I think I'm going to port this track so it flexes better and takes less hp to turn it. I've heard of some using a hole saw(with teeth ground off and made sharp) to cut the windows open too but I'll probably chisel them out.
I think I'm going to port this track so it flexes better and takes less hp to turn it. I've heard of some using a hole saw(with teeth ground off and made sharp) to cut the windows open too but I'll probably chisel them out.
I've done the windows a couple times with a couple of utility knives blades and some wd40 or similar lube. Goes prett quick once you get the hang of it.
tough to make a square hole with a round saw, and those hole saws work much better on a rubber track with sharp teeth like if you wanted to port it. track porting and window punching are two different things. i am on the fence with porting. having done my fair share, the weight savings is minimal. a 151 track will yield less than a 1/2 lb of little circles when your done doing a 3,2,1 stagger. snow evacuation is the plus side of porting. i have gone to using the same chisel theory and duplicating polaris style by porting rectangles up the center that look like drive windows.
as Msb mentioned in the previous post, utility knives do work and the wd can help a little, but straight cuts are difficult with this method and overcuts are a common problem. thats why i went with the chisels. four hits per hole and they are as clean and straight as the originals.
now when it comes time to cutting track lugs down, theres a trick for that as well, should the need arise.


