

I have the 153" skid from a 2009 m1000 and a 162" camo track from a summit x. I am trying to copy this http://www.totallyamaha.net/forums/...nd-162-install-complete!-EASY!?highlight=skid
I am kinda new at this, what all should I be looking at and replacing as I do this? Got the stock skid out tonight cut the track and removed it too since it was so shot.
Weight on the new parts is about 20lb less than what I had according to my scales. Skid is 30 lighter and the track is 10 more. Should be interesting...
Edit. I actually got sent a 2009 m1000 162 skid. I moved the front mount forward 3.75" I believe, should have done 4" since I also did a big wheel kit and it barely clears the rails at the back.
Last edited:
Backwoods M Max
New member
First things first you will need new cross shafts for the mounts. I just put an ez-ryde skid that came out of a cat. Cat tunnel is 15.5" wide yami tunnel is 16.5.
Did you get all the axle measurements from the old sled? Those will be critical. A 153 skid with 162 track is going to leave a lot of track without rail under it, probably going to need anti stab rollers on the rail tips.
Did you get all the axle measurements from the old sled? Those will be critical. A 153 skid with 162 track is going to leave a lot of track without rail under it, probably going to need anti stab rollers on the rail tips.
I was hoping to use nylon spacers like the guy in the thread I linked for the width difference, any reason you think that won't work?
I have the measurements, looks like where he mounted it is slightly closer together for the mounts than they were factory. I would like to do it there also but will check the travel to make sure nothing binds.
Hadn't thought about anti stabs, you really think I'll need them with 2.52 track? Always hear of the 3.0 guys putting then in...
Also what do you all think about the width of track. What I have is 16. I was planning to cut it down but have seen now that it could fit, just not sure I want that much track for a 700.
Backwoods M Max
New member
People have used spacers, but I would consider that very dangerous. Your asking that bolt to carry a lot of load in shear when it's there to hold the suspension into the tunnel in tension only. The shear load is taken by the shoulder on the reinforcement plate on the inside. Work on the shop floor and safe to go flog out in the woods are 2 very different things.
I am not one bit worried about the sheer of that bolt. A grade 8 bolt that size has a sheer strength of over 10000lb EACH! The bracket I would worry about a lot quicker, especially since this skid uses two short bolts instead of a solid cross bar. I think I may change that.
Work in progress pictures


Did some more researching on the Cat forums. They do a mod to improve handling of the skid that puts the mount locations the exact same distance as the hole I was wanting to use it looks like. Called the GEO mod. I will move the bottom bar by the scissor forward and up a little on the skid to complete the mod.
Bought some shocks for the front and some powder pro skis also. Sadly the bolts were rusted on the ski mounts and all broke when I went to swap them with my mounts. New carbides on the way though so that'll fix them up nicely. The new shocks sit the front just a touch higher if I want them to so I'll try some different heights probably.
I also have some new rear and top wheels coming for the skid as my bearings are a bit rough. Billet wheels and I'm going to 9" in the rear, should help it spin a bit easier I think.
The guys I bought the wheels from recommend removing all the bottom wheels from the skid except the rear ones of course. As I will never see more than a mile of anything close to a trail I think I'll do that. Hyfax will last me a long time as should I get less than 200 miles a year all in the powder.
Antistab kit on the way too. I don't want to chance that. After looking it up I decided its cheap insurance.
Last edited:
This is what my secondary looks like. I cannot find details in this thing anywhere. Is it just an adjustable cover for the helix from SLP?
Is there any way to see what helix I have without taking it apart? I have no tools for compressing clutches so not sure how to get it apart safely either.
Is there any way to see what helix I have without taking it apart? I have no tools for compressing clutches so not sure how to get it apart safely either.
call slp, they can tell you all about it. its about 10 years out of the catalogue. old school roller secondary. no special tools needed, treat it as you would a stock yamaha secondary to get at the helix. thats the only way you will know the angle.
Thanks snowdad4. That explains why I couldn't look it up on their site...
This morning I tried to take the chaincase off so I could pull the driveshaft and swap my drivers. I can't get the top gear off. Any special trick to it? I was holding with the brake and can't get the nut loose. I soaked it down with WD 40 and will try again later I guess.
This morning I tried to take the chaincase off so I could pull the driveshaft and swap my drivers. I can't get the top gear off. Any special trick to it? I was holding with the brake and can't get the nut loose. I soaked it down with WD 40 and will try again later I guess.
Got the gear off this morning. Guess it just needed more persuasion...
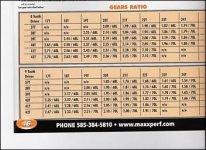
I think I'll try running this with 19/40 gears first since that is the most reduction I can do with parts I have here. Looks like a lot of people went with 19/42 when they Long tracked so I may have to order a 42 yet.
I only have a few minutes most days to work in this thing so progress is really slow. Maybe I'll have some if my new bearings by sat and can get more done then.
Backwoods M Max
New member
Just be careful with a 19 top gear. I have been advised by multiple tuners that a 19 likes to break chains. At the very least a new chain every year should be in a maintenance play if you do run it.
A couple of bucks
VIP Member
What all gears do you have and what drivers?
It has 20/40 right now. Maybe I'll leave it at that and try it first then. Hadn't heard that about the 19.
I have either 19, 20,21 and only 40 for bottom. Drivers 8 tooth extros 2.52 pitch
I have either 19, 20,21 and only 40 for bottom. Drivers 8 tooth extros 2.52 pitch
Backwoods M Max
New member
I'd have to say that running higher than 2:1 chain case ratio is going to leave you struggling for track speed. I know that you want to gear it down with a sneaker that big, but you'll be relying on a very fast upshift for track acceleration, I couldn't imagine that the engine rpm increase will give you much like that.
A couple of bucks
VIP Member
Worked on the new skid a bit today...
Before
after
I'm now waiting on the rear bushing for the new trailing arm and the left driveshaft bearing before I can get it back together.
This week I'll tinker with the tunnel extension I guess...
Before
after
I'm now waiting on the rear bushing for the new trailing arm and the left driveshaft bearing before I can get it back together.
This week I'll tinker with the tunnel extension I guess...
Very frustrating day today. I mounted the skid up to test fit. I guess I got sent a 162 rail not the 153 that I bought. So that means my mounts all have to be moved forward around 4".
I guess I will probably make a new bracket for the front thick enough that I don't have to use a spacer for the narrower cat skid.
Then I will likely have to move the rear bracket forward.
Definitely not as easy as this was supposed to be...
I guess I will probably make a new bracket for the front thick enough that I don't have to use a spacer for the narrower cat skid.
Then I will likely have to move the rear bracket forward.
Definitely not as easy as this was supposed to be...
Backwoods M Max
New member
You may have issues with the rail tips hitting the drivers when you do that. Not a big deal but you may need to trim them and put in an anti stab kit.
Brackets made and initial paint on them.
Removed old tunnel extension and test for new one. Sadly that's all the time I had there this eve.

Removed old tunnel extension and test for new one. Sadly that's all the time I had there this eve.