
Well, I miss the first one so I mise well build another one. I have a nice viper to start with and will be taking it apart and getting stuff powder coated and other stuff painted. The hood/fairings is already at the body shop(had a extra blue complete set up). Bob Wiles, the same guy who did the unbelievable job on the first one is doing this hood as well. The gloss black powder coating will be done by Amatosrx from this site.
This sled is already equipped with my stage 2 viper ported engine, will still utilize the single pipe exhaust for now but was built with the CPR pipes I have hanging in the attic kept in mind, so they can be added later with just changing the jetting/clutching set ups. Also currently equipped with 40-10 heel clicker clutching and differnt chaincase gearing. The skid will be equipped with oversize idlers and 7.5 rear wheels.(( I actually want to swap in a mono))..
EVERYTHING thats silver on the exterior will be made BLACK!!")
The purpose of this sled other then just my trail sled and looks is it will be used as a "test bed " sled for when people come over to clutch sleds and use this sled as a base.
YOU DONT KNOW THE POWER OF THE DARKSIDE !
This sled is already equipped with my stage 2 viper ported engine, will still utilize the single pipe exhaust for now but was built with the CPR pipes I have hanging in the attic kept in mind, so they can be added later with just changing the jetting/clutching set ups. Also currently equipped with 40-10 heel clicker clutching and differnt chaincase gearing. The skid will be equipped with oversize idlers and 7.5 rear wheels.(( I actually want to swap in a mono))..
EVERYTHING thats silver on the exterior will be made BLACK!
The purpose of this sled other then just my trail sled and looks is it will be used as a "test bed " sled for when people come over to clutch sleds and use this sled as a base.
YOU DONT KNOW THE POWER OF THE DARKSIDE !
Attachments

Last edited:
Good luck with your project. Have fun..
I cant wait to see this bad boy!!!!
snoprokidf6
Member
^^^^ what he said
tippmannator
New member
sounds like a great build!! cant wait!
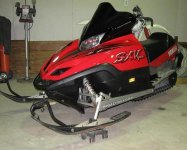
Well, most everyone has seen a stock viper but this is the one I am starting with, its in great shape and will be a fairly easy project as I have already done some stuff to it that is part of this project. I will explain the skid set up and things as I go thru this. There is also information on the skid getting it all level and stuff in the first Darth Viper build in this forum.
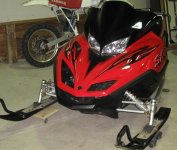
Anybody looking for a nice red hood /black fairings and seat?
Here it is before teardown...................
Anybody looking for a nice red hood /black fairings and seat?
Here it is before teardown...................
Attachments

Last edited:
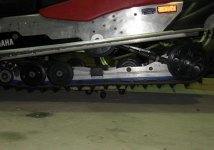
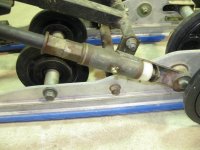
I had previously installed oversized 5.350" idler wheels (all 6) and also changed out the rear axle wheels with 7.5" diameter units from a 79 srx440, this gets the track rolling very easy, free power to the ground thru less parasetic drag. Your hyfax will last about forever also. I still use the aftermarket wheel kits for the curve. Youll need to trim down the axle spacers to use the older wider bearings but its easy and also listed in first build.
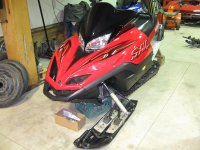
Sled already had the yamaha running board stiffners on it. I will remove those as I am thinking of having the tunnel done in a rhino bedliner black, then powdercoat the rear suspension bolt tabs and reinstall the stiffners to break up the matte finish of the bedliner spray. I only thought about using the liner spray because the paint was so nice on the previous sled I was afraid to put my feet on the running boards!
Sled already had the yamaha running board stiffners on it. I will remove those as I am thinking of having the tunnel done in a rhino bedliner black, then powdercoat the rear suspension bolt tabs and reinstall the stiffners to break up the matte finish of the bedliner spray. I only thought about using the liner spray because the paint was so nice on the previous sled I was afraid to put my feet on the running boards!
Attachments

For those of you with the keen eyes, youll notice the sled is lowered already and the handle bar hook and hooked brake lever. Throttle is offset to the inside of the bars as well. I actually set up this sled to run at a circle track race for this year. Last year was the first time they tried it and it was a huge success, so this year theres talk of a 3 race series, which I will run this sled in. 
When I remove the skid, I am gonna point out with some pics the basics of lowering it down either for drags or roundy round,etc. its been explained on the site but pics are worth a 1000 words.
When I remove the skid, I am gonna point out with some pics the basics of lowering it down either for drags or roundy round,etc. its been explained on the site but pics are worth a 1000 words.

staggs65
Moderator
carbon fiber
youre the one who got those. wanted those too. you beat me to em
youre the one who got those. wanted those too. you beat me to em
Last edited:
srxman72
Member
nice 490, im sure thats a fun ride. Big old
Last edited:
Concept Carbon
New member
mrviper700 said:Bought these real carbon fiber parts from the member concept carbon on here, figured they would go good with the darth viper theme.
nice parts they will go perfect with that sled, will add a little pop to the the black, I love carbon next to black paint. Do you have a set of my windage plates? I just found this cleaning my basement totally forgot about it, needs some work but could be nice.


concept, how do you get the saran wrap or the clear plastic off of the parts? That pod would be bad azz on this sled, what about making the side you see smooth and shiny? I dont know what kind of resin or what is used. let me know its something I can see on the sled. No, I dont have the windage plates.
I tore it all apart tonight, front suspension,and the rear skid out of sled to get stuff ready to send to Amato srx, he is going to powder coat it all gloss black. Will add pics of the teardown.
All of the bolts holding front suspension will get put into a peice of cardboard and the heads bead blasted and painted satin black.
All of the bolts holding front suspension will get put into a peice of cardboard and the heads bead blasted and painted satin black.
I am ready don. can't wait to help you on this project. it should look real nice. I am ordering the gloss black today.
Concept Carbon
New member
mrviper700 said:concept, how do you get the saran wrap or the clear plastic off of the parts? That pod would be bad azz on this sled, what about making the side you see smooth and shiny? I dont know what kind of resin or what is used. let me know its something I can see on the sled. No, I dont have the windage plates.
I used west system resin, the shinny side is the side i pulled off the mold, the plastic saran look is actually excess resin where the bleeder cloth was overlapped when it was vacum bagged. When I make parts after this step i wet sand the layer you see then clear coat it, then fill in the pin holes with clear coat then wetsand and again and again. You can paint gel-coat on but it is very heavy turns yellow over time but is easyier.
Sounds like an awesome project Don. Can't wait to see the outcome!

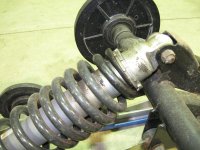
basic drag skid setup
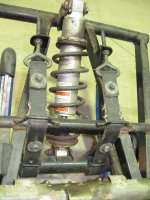
These are some pics of the rear suspension lowered down for racing, I took pics of a few key spots. I will find the write up I put on the forum and attach it here for this post so you can read the write up and see the pics, pics explain a thoudsand words.
(previous post write up")
Rearskid:, loosen up the front skid shock spring, then place a 4x4 block of wood under front of curve on rails/skid, set sled down on it and crank down the front limiter straps.( you will notice in the pic, I moved up the hole in the limiter strap 1.25" from stock)
next loosen up the rear shock spring till you have 1 inch of thread showing(shown in pic), put FRA adjuster bolt on medium. Now the track rear wheels will be about 6 inchs off the ground, all you have to do is remove the bolt from the transfer rods and start adding shims(plastic spacers) to the BOTTOM side of the rods(shown in pic), this will lower the back down and even it out, youll start to see the track sit flat from the drivers to the rear wheels, try and keep about a goal 1/2" clearance between the bottom of the drivers and the surface, this way you wont bend the driveshaft if you hit a bump.
Youll fine tune the rear with the front ski shocks, the more you raise up the front the more the rear wheels will get closer to the ground, but if you add enough shims to the bottom of the rods it will pull them right down,so just get the front close and do the straps to keep from loosing the spring retainers when the front end will come up off the springs last.
this will be fairly stiff and offer only about 2-3 inchs of travel. youll only have about a 1/2 of gap on the top side of the transfer rods, but the sled will hook hard because more of the track surface is touching the ground, penetrating the ice and/or grass providing traction.
__________________
These are some pics of the rear suspension lowered down for racing, I took pics of a few key spots. I will find the write up I put on the forum and attach it here for this post so you can read the write up and see the pics, pics explain a thoudsand words.
(previous post write up
Rearskid:, loosen up the front skid shock spring, then place a 4x4 block of wood under front of curve on rails/skid, set sled down on it and crank down the front limiter straps.( you will notice in the pic, I moved up the hole in the limiter strap 1.25" from stock)
next loosen up the rear shock spring till you have 1 inch of thread showing(shown in pic), put FRA adjuster bolt on medium. Now the track rear wheels will be about 6 inchs off the ground, all you have to do is remove the bolt from the transfer rods and start adding shims(plastic spacers) to the BOTTOM side of the rods(shown in pic), this will lower the back down and even it out, youll start to see the track sit flat from the drivers to the rear wheels, try and keep about a goal 1/2" clearance between the bottom of the drivers and the surface, this way you wont bend the driveshaft if you hit a bump.
Youll fine tune the rear with the front ski shocks, the more you raise up the front the more the rear wheels will get closer to the ground, but if you add enough shims to the bottom of the rods it will pull them right down,so just get the front close and do the straps to keep from loosing the spring retainers when the front end will come up off the springs last.
this will be fairly stiff and offer only about 2-3 inchs of travel. youll only have about a 1/2 of gap on the top side of the transfer rods, but the sled will hook hard because more of the track surface is touching the ground, penetrating the ice and/or grass providing traction.
__________________
Attachments
Last edited:
just ordered the the high gloss mirror black 2 for your parts don. it will be here 5 days. it is the most gloss black ever.