

Just got all the parts back from powder coating, they all came out good, the trailing arms will need a little sand/buffing. wet/dry 400, then 600, then 800 and buff to be smooth, they kinda came out a little dull and rough but not too bad. I did a little reading on the internet and you can sand and buff the powder coat when its the poly urethane like what we used on these parts.
I will begin now to reassemble the rear skid, add the rail extensions, over size wheels and oversize rear wheels. I will take some pics and show you how to square the skid up when you have them out.
Waiting on the hood,fairings,tunnel to be painted base coat /clear coat, then this thing should go together quickly.
Attachments

change_up
New member
Perfect. Should look real good. I can't wait to read up on getting the whole sled in line. I will be doing the same thing to my 2000 srx. Haven't decided if I'm going to do it now, or wait until the summer when it's warm, but i love these descriptive how-to's. I can't wait to see thel outcome. Keep it up Don!
viperking
Active member
lookin good
man that is going to be one sweet ride, wanna sell it when your done?? HAHA j/k
That sled is going to look sick! I really like the look of black Vipers. G.B.
YAMAHIZAL700
New member
Do you do the paint, powder coat yourself or do you have a guy that does it and if so how much does a job like that run? I bought a powder coat kit on line awhile ago but never made anything big enough to put the trailing arms and stuff in. Ive heard of guys gutting a refriderator and hooking up stove parts inside of them. What sort of speed do you expect for the big bore?
I dont do the paint or the powder coat, a friend of mine has the powder coat operation and I helped him do it all( I moved the parts from oven to spray (preheat)and back in oven for curing,so he didnt have to do all the grunt work), its kinda neat to do it, its very messy though! He has a huge oven he built, its 4 ft deep and 6 ft wide. It runs at 370 degrees, using pizza oven burners. He is very reasonable on doing the powdercoating, especially if you have all your parts presandblasted. Thats where all the time is, preparing the parts. You need to have alot to do to make it worth while to fire up the oven. There is about any color you could imagine in powdercoat!
The painting, I just took the hood and tunnel to a bodyshop. I have painted base/clear before. I painted a couple cars I had and they came out perfect, but it takes me double the time because I am so cautious. Although it is very easy to work with , it too makes a large mess in your shop. Theres lots of things you have to watch for the temp, the dust, the humidity all go with how fast of a reducer or thinner you use, the slower the thinner the more the paint flows as it drys slower, it gets super smooth and wet looking, but also the easier it is to get runs. I am not a good paint work person as I am always worried if I have to fill something a dent,scratch etc, I always end up sanding all the filler back out because I am worried about a mark when you apply paint over the repair, a wave or ripple effect.
I just about have the rear skid back together and will be showing you how to square up the skid, it most definitely needs it, its way out in left field. Install oversize wheels and how to install oversize rear wheels and the setting up of the rear spacers. Just need a couple small parts then the pics and how to will be coming.
Coles55, they are always for sale.......
Last edited:
Nice! Let me know when its done so I can buy the damn thing!
What?!?! No pictures since February 2?!? Don't you ever work around there?!?!


03viperguy
Moderator
lol! I would say something too, but I still have not done the writeup for the tech pages on the mono install.. shame on me 
Concept Carbon
New member
this is gonna look amazing, cant wait to see the finnished product.
I will get the skid pics up, showing where to grind the spacers for wheels and why you need to square the skid, just been working on other peoples stuff and as usual no time for my own.
03viperguy
Moderator
lol, time is such a scarce commodity!

Interested in hearing more about squaring a skid. Thanks!
Some more progress
I finally got the rear skid assembled and squared, oversize wheels added thru out skid.
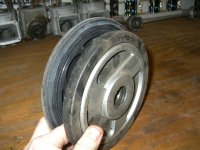
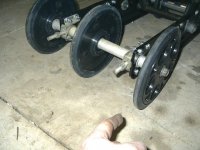
I added 5.350" polaris idlers on all 6 small wheels in skid. All you have to do is pop out your original plastic bushings and install them into the polaris wheels and they bolt right on. The 2 inside rear wheels press directly on the axle same size bearings as stock.
For the rear wheels I use a 1979 srx440 for the application when getting wheels, this gives you the 7.50 diameter and the 20mm i.d. bearing so it fits your axle, all srx,vipeer, sx,mtn max etc use a 20mm axle.
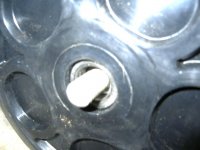
The only thing youll have to do is shorten the rear axle spacers slightly, the old bearing s are thicker then the new 2000-up bearings and if you dont shorten the spacers the axle will not support the outside idler wheel very well.
In the first pic you can see the size differance between the 7 and the 7.5"
second pic shows you what happens if you dont shorten the rear axle spacers.
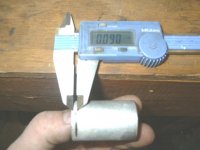
third pic is of the spacers to be shortened, cut off approx .080-.090" off all your spacers, this will let the axle fit thru the bearing more and support it.
I finally got the rear skid assembled and squared, oversize wheels added thru out skid.
I added 5.350" polaris idlers on all 6 small wheels in skid. All you have to do is pop out your original plastic bushings and install them into the polaris wheels and they bolt right on. The 2 inside rear wheels press directly on the axle same size bearings as stock.
For the rear wheels I use a 1979 srx440 for the application when getting wheels, this gives you the 7.50 diameter and the 20mm i.d. bearing so it fits your axle, all srx,vipeer, sx,mtn max etc use a 20mm axle.
The only thing youll have to do is shorten the rear axle spacers slightly, the old bearing s are thicker then the new 2000-up bearings and if you dont shorten the spacers the axle will not support the outside idler wheel very well.
In the first pic you can see the size differance between the 7 and the 7.5"
second pic shows you what happens if you dont shorten the rear axle spacers.
third pic is of the spacers to be shortened, cut off approx .080-.090" off all your spacers, this will let the axle fit thru the bearing more and support it.
Attachments
Last edited:
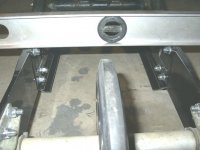
Once the rear skid was put back together it was terribly out of square, but you might be suprised at how out of square your unit can be in your sled right from the factory, to check this you need a good level surface in which to place the skid on. You can check very easily by seeing if all the wheels make contact with the level surface. Do they all have pressure on them?
You will notice the skid can rock back and forth diagonally, this means the skid is uneven from side to side and this requires nothing more then loosening all the mounting bolts to the rails and applying pressure to the tops of the rails and retighten up bolts with the pressure being applied to the skidframe, this assures the skid is now applying the same pressure on the track on each side. You can simply lay boards across the top of the rails front and back and have someone stand on it or apply pressure to it. I use my hyd. car lift since its readily available.
pic 2 and 3 show you what wheels didnt make contact with the level ground when sitting there, you can spin them and all the rest are tight to the surface.
Attachments

Last edited:
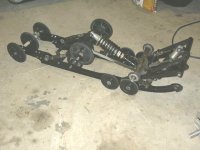
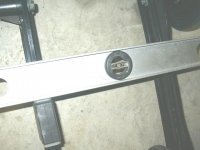
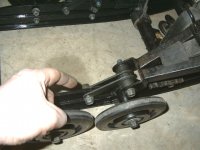
you will need to loosen these bolts and let the skid spring back, you apply weight to the tops of the rails both front and back, you can see the level I have on there, this is where you will place a 2x4 or whatever and then apply weight to the skid, you must do both the front and back at the same time to accomplish this. So you either need 2 friends over to help or jack something up and place on the boards.
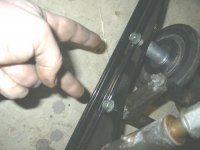
in the first pic this location and right before the rear wheels, right behind the rear transfer rods is where you want to put weight on it while the bolts shown in the other 2 pics are loose, the front arm connects to the rails with 2 bolts, the other bolt goes thru the first idler wheel assembly.
the rear skid bolts that need to be loosened up are rear scissors and rear idler axle.
Attachments
Last edited:
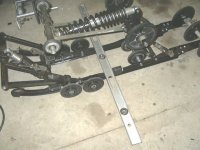
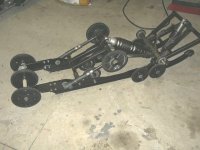
All done and squared up ready for install, the rear bumper pads need reriveted on and needs some paint work on the transfer rods before being put back in.
Something I forgot to mention about installing over size wheels is that you also want to look at the bottom of the rail surface to the level surface you have it sitting on, you want the rails to be equal from the front portion all the way to the rear. If you only install larger 4 fronts as commonly done what happens is you apply more pressure to the front only and create a warp in the track while running, this contributes to strange hyfax wear patterns and loss of speed from uneven pressure. The most likely culprit you will find is the twin set of wheels in the rear section behind the scissors(between the rails), these alot of times wont be touching the ground, or too low, and will need the hole slightly drilled out in the rail in order to apply pressure the same as all the other wheels. This stuff applies to all sleds and speed running and radar runs can benefit from this stuff as well.
Something I forgot to mention about installing over size wheels is that you also want to look at the bottom of the rail surface to the level surface you have it sitting on, you want the rails to be equal from the front portion all the way to the rear. If you only install larger 4 fronts as commonly done what happens is you apply more pressure to the front only and create a warp in the track while running, this contributes to strange hyfax wear patterns and loss of speed from uneven pressure. The most likely culprit you will find is the twin set of wheels in the rear section behind the scissors(between the rails), these alot of times wont be touching the ground, or too low, and will need the hole slightly drilled out in the rail in order to apply pressure the same as all the other wheels. This stuff applies to all sleds and speed running and radar runs can benefit from this stuff as well.
Attachments
Last edited:
JeepTherapy
New member
Very good information on the skid, thanks. I am looking at the different things to do to my sled over the summer. This along with replacing the bushings in the skid are on there now.