musselman
Active member
That looks excellent, I will have to reference these pics when I put in my viper foot rests.
Keep up the good work!")
Keep up the good work

super1c
Super Moderator
musselman said:That looks excellent, I will have to reference these pics when I put in my viper foot rests.
Keep up the good work
Thanks, and thanks again for your help.
super1c
Super Moderator
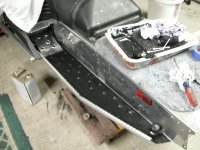
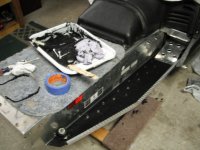
Got the left side trailing arm brace/bracket all back in and riveted. Wow those 1/4 rivets are impressive looking. Wouldnt want to pull those by hand, used the harbor freight air riveter! Also riveted in the front of the new rail to the footwell. I left the other rivets loose untill i get the tunnel ext just incase i have to make any adjustments. I also got the right side done. They both turned out really nice. Even came out pretty flat, not perfect but best i could do. The whole template idea didnt work out so well, each side was just a bit different. Best way is to lay the rail out and do each side as its own. I did notice that their wont be much traction now. So im going to try this stuff called stomp grip, its used a lot in snowboard and motorcycle stuff for grip. You can get it in clear and black in large universal sheets. So im thinking shine up the footwells and go with clear and see how it turns out.
Attachments


staggs65
Moderator
lookin good. I'm gonna do the BTV running boards to my Mountain Viper.
musselman
Active member
That looks really good . You will love the extra width.
. You will love the extra width.Turned out better than mine! They work good but I fear some cracking on mine...  Either way they look great Chris! And +1 on the template not really working.
Oh what model cat rails did you use Chris? I used M7 rails...
musselman
Active member
They look like the ones I used from a 2002 zl 600
super1c
Super Moderator
musselman said:They look like the ones I used from a 2002 zl 600
Yup same ones as musselman. I have the part numbers at home, $18 a piece.
super1c
Super Moderator
SXRider7Hundo said:Turned out better than mine! They work good but I fear some cracking on mine...
I have a few idea's im going to start working on tomorrow when i get up. My goal is to make them strong at that point where they can crack. Right at the part where the trailing arm brace bolts to tunnel. I fixed that a little by making the rails fit without cutting a slit in the running board, just notching the rail out. Ill see if it works and post up some pic's in the next day or two. Also looking at doing the bedlinner to just the floor boards instead of the stomp grip. To many details in the boards to work around to make a nice clean fit. Im thinking black or red, not sure yet.
super1c
Super Moderator
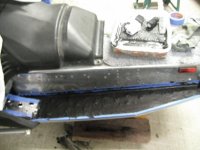
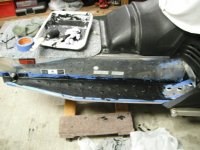
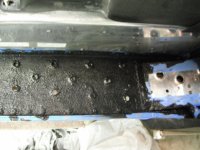
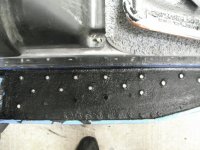
Finished the running boards today. The more i looked at it and thought about it as long as you dont cut a slit into the running boards for rail to fit no need for further reinforcement. I just notched out the rails for fit. If anyone wants the part numbers for those just PM me or ask and ill post them. I also have a lot of in progress pic's also if wanted. The rails are very strong and forgiving to work with. I used all the rivet holes on rail to boards along with all four on trailing arm brace. Should be very strong but only a season of abuse will tell. Used duplicor with kevlar for bedliner on boards. The pics dont really show how awesome this turned out. It is really sharp. Will polish rails and tunnel when dry and it will be awesome looking. Ordered tunnel extensions today, went with hartman. So that will be next week project.
Attachments
sleddineinar
VIP Member
Things are lookin' GREAT!!
snoprokidf6
Member
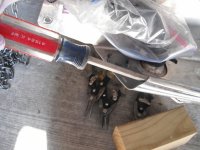
Can you post a pic of the tools you used to perform this modification, and the ones to flatten the board once rolled out.
Thanks
Thanks
I just used a claw tool and I used a body hammer with a small piece of steel to lightly tap out the dents.
super1c
Super Moderator
SXRider7Hundo said:I just used a claw tool and I used a body hammer with a small piece of steel to lightly tap out the dents.
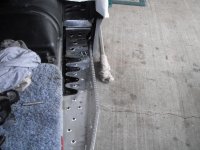
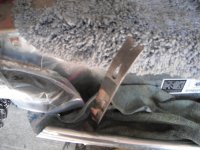
X2. I first used a screwdriver to pry open end. This part will be covered by hose cover so dont worry about scratching the tunnel. Then used a small pry bar with a rag to protect the tunnel, and stepped up to the next size pry bar. I then used a big pair of channel locks with lots of electrical tape on it so not to mark up tunnel to SLOWLY lay tunnel flat. Go slow very easy to tear the aluminum. I did but it was on a part i was cutting off anyway by luck. I then used a body hammer to get it as flat as i could. Like i said before it wasnt perfect but looked pretty good. If your going to use the bedliner on the floor boards you dont have to be as careful about marking up the floor boards. The bedliner dried very well. A few touch ups and its good to go.
Attachments
super1c
Super Moderator
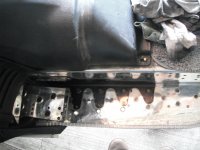
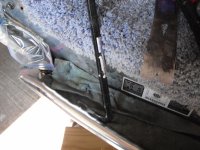
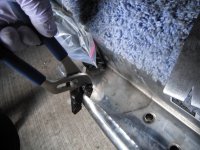
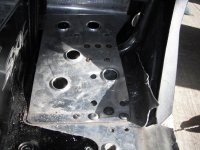
I think the big part of making this strong it to rivet the rail at the foot well like the original was. The rail is then riveted right to that trailing arm support. So the whole rail, trailing arm support and floorboards move as one. No flexing. Here is a pic of the four rivets i knocked out then reriveted the new rail the exact same way. If you look close you will see three on the side and one all the way to the end of the foot well. Just knock them heads off with a sharp chisel and puch through. You will have to remove the bottom rivets on the belly pan so you can pull it away to get at brace.
Attachments
musselman
Active member
Yep that's the best way to do it, very strong. I am redoing mine this summer now that I have the footrests and plastic off.
FJViper
New member
Wow!! Haven't checked in lately. You've made alot of progress Chris...Looks great!! I like the bedliner touch. That looks sharp.
killerklown
Member
that bedliner should be factory installed... i like it.
gil7247
VIP Member
That turned out nice Chris