Waters88
New member
I have never seen a clear skid plate for a snowmobile.....hmmmm.
The reason I asked about dying plastic is because I race RC's, and have dyed my own rims and chassis before, with good success.
The reason I asked about dying plastic is because I race RC's, and have dyed my own rims and chassis before, with good success.
tippmannator
New member
i have read alot of very interesting things about vacuforming lexan/polycarbonate. if one where to build a jig big enough, its possible you could do a clear skid plate molded from a holeshot skid plate for instance. the only thing i havnt found out much on is how thick the lexan can be and still be vacuformed. but it would give you the option to paint the inside like i mentioned in an earlier post here. if you youtube how to vacuform, there are a ton of videos of the possibilities. cool stuff. just thinkin out loud ")
!")

super1c
Super Moderator
Will check it out for sure.
Even if this is a girls sled, I CANNOT wait for the finished product. Very inspiring to those of us looking for new ideas.
tippmannator
New member
SXlover said:Even if this is a girls sled, I CANNOT wait for the finished product. Very inspiring to those of us looking for new ideas.
i agree
super1c
Super Moderator
Thanks guys! Just finnishing up a long weekend at work then off for a few. We hope to get more of the suspension done. Just ordered my bushings. The drive will take a bit yet as i decided on a new track.
tippmannator
New member
what track did you choose
super1c
Super Moderator
tippmannator said:what track did you choose
Dont have one yet. When i replaced my wifes track 2 yrs ago i went with a 1" predrilled ultimate traxion. Very nice track. Its kinda in the air right now, i just know we will get her a new track. Depending on funds i may go with a ultimate again.
super1c
Super Moderator
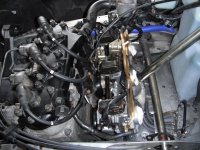
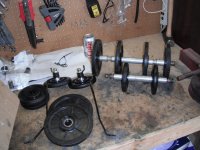
No parts yet today so tore the carbs down and got them ready for cleaning. To my surprise they were spotless. Jets, top hats, bowels, everything looked great. Of course i will give them a good cleaning and move the needles up. I will be running my needles with clip in 4th groove down and both washers on top per MRVIPER. Im also running a opticool headgasket so should be a trouble free winter. All my vipers will have the opticool and needles moved for the upcomming winter. Come to find out i was reading jet wash wrong and all my vipers were running lean. So with moving the needles im hoping that will correct. I was stock on both last year when checked.
Attachments

Last edited:
How did you manage to get you slides out? I'm having a heck of a time trying to get those explative flat heads out...
super1c
Super Moderator
SXrider, First you have to remove the screw that holds the slide arm to the rail. That allows you to be able to get at those 2.5mm allen head bolts. It also allows you to be able to swing the arm up and out of the way to get the slide out. Gave you a few pics that i hope help. Sorry if a hair blurry but camera battery was dying. Chris
Attachments


A couple of bucks
VIP Member
Super,
This picture looks much like mine did. My son gave me a tip for breaking down carbs. He went in the house and got the most beat-up cupcake/muffin tin we had and proceded to break my 4 carbs down on my KZ1100. The tin kept all parts together and for the most part, in order.
Needless to say, the tin obviously never came back in the house and the 'ol' ball & and chain eventually found out about our shenanigans. WOOOOOOPS.
Attachments

super1c
Super Moderator
A couple of bucks said:Super,
This picture looks much like mine did. My son gave me a tip for breaking down carbs. He went in the house and got the most beat-up cupcake/muffin tin we had and proceded to break my 4 carbs down on my KZ1100. The tin kept all parts together and for the most part, in order.
Needless to say, the tin obviously never came back in the house and the 'ol' ball & and chain eventually found out about our shenanigans. WOOOOOOPS.
That is a great idea!! Now where does my wife keep the muffin tins??
One more household item sacrificed for the good of snowmobiling LOL!!A couple of bucks
VIP Member
A wize vulcan once said...."The needs of the many, outweigh the needs of the few".
SACRIFICE THE MUFFIN TIN
SACRIFICE THE MUFFIN TIN
Yeah its the flathead screws that hold them to the rails that are the PITA. I'm working with them slowly but surely. Thanks Chris
Steve
Steve
super1c
Super Moderator
SXRider7Hundo said:How did you manage to get you slides out? I'm having a heck of a time trying to get those explative flat heads out...
I see, your having trouble getting out the screws that hold the slide arms to the rail. I gave mine a good soak with pb blaster and used a good phillips screwdriver that i could
Put a bit of force and torque into it. As you said do go easy they are easy to strip.
super1c
Super Moderator
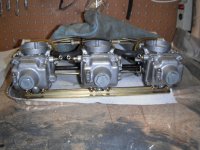
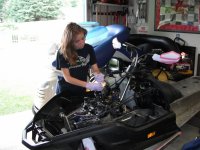
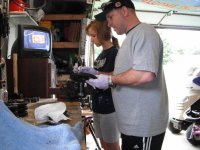
Got some good work done today. Got the y pipe installed (bit heavy on the copper spray i see, LOL!) and the carbs installed. Pic of my new float bowel screws, just local hardware pic up, Stainless steel allen head. Things are comming together nice. Pic of elizabeth screwing down intake boots. She got a pic of me doing somthing?
Attachments

Last edited:
super1c
Super Moderator
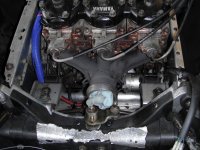
Also got the front end finnished, spindles installed. We did did get to grease all the bearings for the suspension and get those ready. Man it was nice to have a extra set of hands doing bearings. Now to get that help with the other 3 skids!!
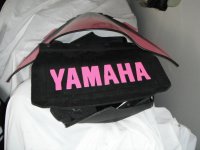
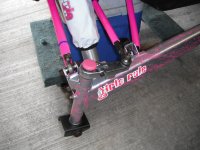
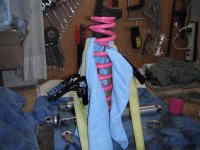
Also got the rear shock springs remounted. Pic of my (as i call it) redneck spring compressor for the rear shock. Got the idea off youtube and it works very well to compress the spring. We also took some reflective pink tape and outlined the yamaha on the snow flap. Turned out pretty cool. You can see the fourth wheel kit i made is ready and ice scratchers will go on the second wheel on the front.
Also got the rear shock springs remounted. Pic of my (as i call it) redneck spring compressor for the rear shock. Got the idea off youtube and it works very well to compress the spring. We also took some reflective pink tape and outlined the yamaha on the snow flap. Turned out pretty cool. You can see the fourth wheel kit i made is ready and ice scratchers will go on the second wheel on the front.
Attachments
Last edited:
tippmannator
New member
looks like its all coming together!!
super1c
Super Moderator
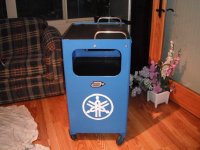
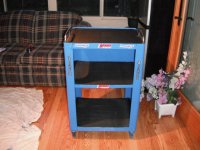
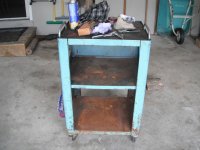
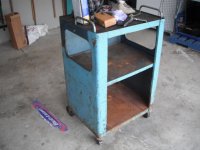
No sled work today but i did have a fun little project. I have been looking for a nice little tool stand since my wife wants her computer table back that i stole to keep my tools on when i work on the sleds. My mother-in-law was getting rid of one of my father-in-laws old tool stands. I think it was from GM back in the day when he worked at the plant. Either way it was in rough shape but free so good deal for me. Gave it a quick sanding, primer, and a good coat of yamaha blue and presto!! Made a paper stencil off the emblem on the back window of my truck for a outline and then free handed the yamaha emblem on each side. Not perfect but looks pretty good. Then a few stickers i had laying around to finnish it off. This will make a perfect garage tool stand for me. And the wifes happy she got her table back. Makes up for the muffin pan i stole that she doesnt know about yet. LOL!! What do ya think?
What do ya think?