red rider
New member
do you have anymore video's to post?

musselman said:Thanks guys, yah I just installed these seals last year so they only have 3500 km on them. I'll just clean it up and keep an eye on it, don't really want to do an engine tear down at this point.
the crankseals are a double lipped dual spring seal, doubt its leaking any air. Usually they leak because of age and the rubber starts to get hard and brittle and bits wear/fall out and the seal drws in air. You can check it pretty easily with engine out if you cant sleep at night.
just make covers for the exh outlets and some wooden dowel plugs for the intake boots, put a low amount of air pressure in engine via the crankcase nipple for fuel pump, only like 6-8lbs.of pressure. Spray seal with fantastic or something soapy and it will foam wherever there is a air leak. you can also put the air in thru sparkplug hole with piston at bdc on the pto for just that seal, just put rubber vac plug on crankcase nipple.
musselman
Active member
No more videos right now but I got a GoPro this summer so I will get some nice vids this winter.red rider said:do you have anymore video's to post?
musselman
Active member
Thanks for the advice, I would feel better checking them and I already have plugs for the exhaust and intake. Plus I have a leak tester built to use on my blaster which will work great for this too. I will have to get my but in gear and get it done.mrviper700 said:the crankseals are a double lipped dual spring seal, doubt its leaking any air. Usually they leak because of age and the rubber starts to get hard and brittle and bits wear/fall out and the seal drws in air. You can check it pretty easily with engine out if you cant sleep at night.
just make covers for the exh outlets and some wooden dowel plugs for the intake boots, put a low amount of air pressure in engine via the crankcase nipple for fuel pump, only like 6-8lbs.of pressure. Spray seal with fantastic or something soapy and it will foam wherever there is a air leak. you can also put the air in thru sparkplug hole with piston at bdc on the pto for just that seal, just put rubber vac plug on crankcase nipple.
!")
SXvmax700
New member
sled looks sick
musselman
Active member
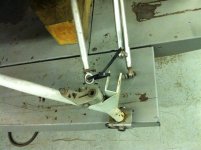
Started to put my front end together this week and ran into a snag. Noticed that my aluminum steering arms will not work with these snocross trailing arms because the radius rod bracket is above the spindle. You can see in the picture how close it is and how it severely limits steering.


I thought of using viper steering arms but then remembered the splines are different, so I'm going to need some custom arms maybe, unless anyone has any ideas. These are the ones used on the snocross sleds, they are similar to viper ones but made for the short spindle splines (The arrow is not pointing to them).

I thought of using viper steering arms but then remembered the splines are different, so I'm going to need some custom arms maybe, unless anyone has any ideas. These are the ones used on the snocross sleds, they are similar to viper ones but made for the short spindle splines (The arrow is not pointing to them).

staggs65
Moderator
what if you threaded the inside half of your steering arm with a helicoil and then radius-ed it on that inside edge where it hits like the ones from the sno-cross pic. not sure if it would work but it's an idea
Boy that's gonna be a squeaker! How different are they? Would you be able to machine an insert to use the viper arms?
musselman
Active member
That's a great idea but I think it hits when turning the other way too. I guess I could have a radius across the entire front then have the split welded, then machine a slot behind with a hole drilled to pinch it on the spindle, but that's a lot of modificationstaggs65 said:what if you threaded the inside half of your steering arm with a helicoil and then radius-ed it on that inside edge where it hits like the ones from the sno-cross pic. not sure if it would work but it's an idea
musselman
Active member
The viper has fine splines where as the other has more coarse splines. I was thinking of getting some viper arms re-splined to match the coarse splines but I don't know if I can do that.SXRider7Hundo said:Boy that's gonna be a squeaker! How different are they? Would you be able to machine an insert to use the viper arms?
U can weld viper splined ends on to your srx one just have to be welded good with a inner solid shaft. Make sure your taper cut both pieces. That way you can use aluminum viper arms. Or cut down some viper ones. The same way.
jamie
Member
Here's the deal. You'll notice the factory snowcross steering arms are rounded at the top to clear the radius rod bracket and the bolt is on the opposite side of the stocker. I'm getting some machined as we speak, unfortunately cannot confirm ETA or price at the moment.
Attachments
Last edited:
chris700readhead
Member
Musselman what Arctic cat are the running board rails off of?
musselman
Active member
I got the edges from a 2002 arctic cat zl 600 and they were $30 each here in canada.
chris700readhead
Member
What was the best way to unroll the edges did you heat them to there nealing point or do it cold, and just rivet the edges on? How bout the steps on the back too? I really like the set up and might do it to mine, not a big fan of narrow running boards. Thanks chris
musselman
Active member
I started with a pry bar under the inside edge to get it started then used a pair of good channel lock pliers that fit under the inside lip to slowly unroll it. The trick is to do a little at a time and move along the entire length so it doesn't tear or deform.
staggs65
Moderator
chris700readhead said:What was the best way to unroll the edges did you heat them to there nealing point or do it cold, and just rivet the edges on? How bout the steps on the back too? I really like the set up and might do it to mine, not a big fan of narrow running boards. Thanks chris
betheviper has a thread with instructions on doing this. there might even be a link to it in his sig
chris700readhead
Member
Thanks guys. Love the sled by the way musselman. Chris
musselman
Active member
Thanks, I just hope I can get it done before the snow flyschris700readhead said:Thanks guys. Love the sled by the way musselman. Chris

musselman
Active member
Just an update,
I am re-positioning my rear suspension to better match the very tall front end. Believe it or not the M-10 is not tall enough in the stock position so I am using some custom drop brackets for the rear to drop the hole below the heat exchanger, then dropping the front so it sits level. When it is done it is going to sit very tall with about 13" of clearance under the belly pan at full extension, but with proper suspension sag it should settle down to a more reasonable height.
I will post some pictures soon...