n2oiroc
New member
for anything reasonably flat use a 120 grit flap disc to get things started. the corners and curves can be done with a flap style sanding drum. a d.a. sander with wet-dry paper starting at 220 and working your way up to past 800 will help it along. its a lot of work but the steps above will cut the time in half.sxviper32 said:is that what your doing?!?!?! thats gotta be super tough!!! i mean all those nooks and crannies, wow your fingers must and knuckles must take a beating. even if its an electric tool, you still smack knuckles movin the bit around tryin to get in the grooves!!! i know i'm working on sanding mine up smooth so i can shoot it with powdercoat. got any tips for sandin it smooth? whenever i used the stone bits, they always fill up so fast with that powder metal or whatever its called. i was thinking of buyin one of those small porting kits to get the tapered sanding bits and such, that'd work nice. good luck!!! hurry up and go out there now so you get it done asap so we can see!!! jk, but we will be waitin to hear and see whats goin on...
sxviper32
New member
you done yet matt???? geeze, come on!!!


2ooosrx
VIP Member
- Joined
- Oct 2, 2004
- Messages
- 2,414
- Age
- 36
- Location
- Gurnee, Illinois
- Website
- www.cbperformanceparts.com
lol, With the motor? no, a lot is being done and it wont be done for about another week, I promise, right when I get it done, I will post pictures. I am taking apart the suspension this weekend inless my gas tank comes in, then I will put the wiring and hoses back and polish the chassis. I would say another 3 weeks to a month before this sled is complete. I havent had to much time for my sled, we have had customer sleds in the shop and have been working on those. I will post some pictures up tomorrow.
seanmurphy26
New member
tommorow is today..
2ooosrx
VIP Member
- Joined
- Oct 2, 2004
- Messages
- 2,414
- Age
- 36
- Location
- Gurnee, Illinois
- Website
- www.cbperformanceparts.com
lol, I havent even gone down to the shop yet today. The pictures will be up around 9 PM tonight. Sorry for the confusion.
seanmurphy26
New member
yoou know im just playin!
03viperguy
Moderator
dude, its 9:30! you lied to all of us  jk!
jk! ")
seanmurphy26
New member
11 i gues ill go to bed :D")

2ooosrx
VIP Member
- Joined
- Oct 2, 2004
- Messages
- 2,414
- Age
- 36
- Location
- Gurnee, Illinois
- Website
- www.cbperformanceparts.com
Sorry guys, It is 10:22 right now and I have been so busy trying to get the carbide video up that it has consumed all of my time. Everytime I try to put the video on Putfile.com I get an error message after waiting 15 minutes in the first place. I will go put up some updates in a couple minutes. Sorry once again.
2ooosrx
VIP Member
- Joined
- Oct 2, 2004
- Messages
- 2,414
- Age
- 36
- Location
- Gurnee, Illinois
- Website
- www.cbperformanceparts.com
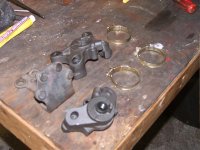
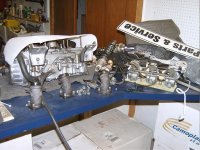
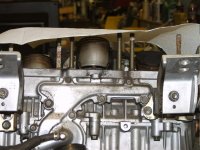
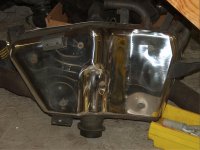
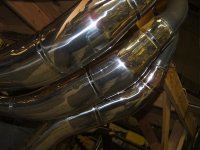
Alright, here are the updated pictures, it is nothing special yet because I have been repolishing all of the stuff I polished last year. Here are the pictures and the water rail, cylinders, and heads will be done in approx a week. In that first picture, all of those items are being sent out to get chromed and a couple more that were not in that photo.
Attachments
2ooosrx
VIP Member
- Joined
- Oct 2, 2004
- Messages
- 2,414
- Age
- 36
- Location
- Gurnee, Illinois
- Website
- www.cbperformanceparts.com

seanmurphy26
New member
lookin good lookin good!!!!!
03viperguy
Moderator
looks nce!
2ooosrx
VIP Member
- Joined
- Oct 2, 2004
- Messages
- 2,414
- Age
- 36
- Location
- Gurnee, Illinois
- Website
- www.cbperformanceparts.com
Sorry once again guys but that carbide video I finally got up took forever. I am down at the shop right now finishing polishing the whole front end. I have basically hit a wall (besides rear suspension) right now because I am waiting to get things chromed, polished, and waiting for some parts. It will start moving again shortly though. I may get pics up tonight if I do something besides polishing. lol
seanmurphy26
New member
sounds good
xsivhp
Active member
uh, I wish I had a "show sled" ........ nice work Dude!
2ooosrx
VIP Member
- Joined
- Oct 2, 2004
- Messages
- 2,414
- Age
- 36
- Location
- Gurnee, Illinois
- Website
- www.cbperformanceparts.com
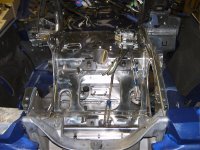
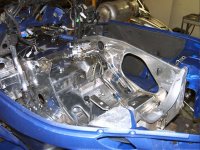
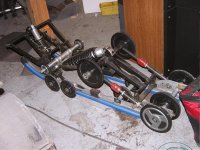
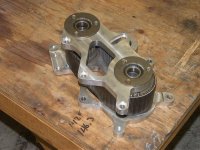
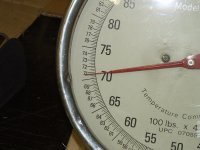
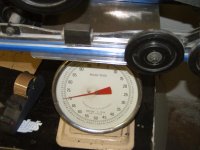
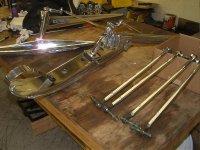
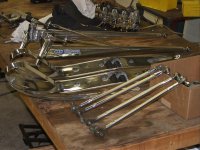
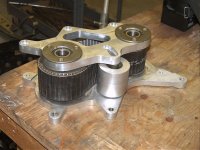
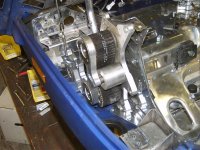
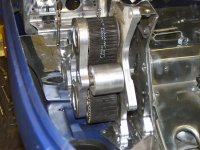
Alright guys, BIG update today. The first thing I did today is polish up my front end of my sled like I said I would. These pictures truly do not do this polishing job justice (One of my best). The entire front end looks like a mirror (not even a finger print). After all of that was done, I decided since we are lightening my rear suspension, we should find out a start off weight. As you can see in the pictures, the suspension weighs 70.75 pounds as is. In that suspension we already have two things that lightened it which I calculated out to be exactly 2 pounds lighter then stock. So figure bone stock (besides the viper shocks and hauck transfer rods) the suspension weighs 72.75 pounds without any of our parts. As for other things, the reason it is a big day is because of the BELT DRIVE! We made up this product over 7 years ago (used it in our 98 srx) and now we are using it again. During testing with it in the 98, we had a problem that when we would brake to hard, the idler gear would move because the wasn't tight enough and the belt would lose tension and slip. We have fixed that this year and it is going back out for testing. Here are the pictures and sorry for the long explanation. Hope you enjoy.
Attachments
Last edited:
2ooosrx
VIP Member
- Joined
- Oct 2, 2004
- Messages
- 2,414
- Age
- 36
- Location
- Gurnee, Illinois
- Website
- www.cbperformanceparts.com

That is one of the coolest looking things I've seen. What do you figure the weight savings are???
2ooosrx
VIP Member
- Joined
- Oct 2, 2004
- Messages
- 2,414
- Age
- 36
- Location
- Gurnee, Illinois
- Website
- www.cbperformanceparts.com
On the belt drive?