jason knowlton
New member
Ya i've been trying to PM him but his message box is full, i would like to see if he would be interested in doing a couple srx windshieldsmrviper700 said:Was made by the ty member: concept carbon, he made the windshield, the front bumper braces and brake duct, did a nice job on them.!")

staggs65
Moderator
I dont think he comes here much any more. He parted out his sled (more than likely where most these parts came from, as well as the top end in my sled by Mrviper) returned it to stock and sold it to another member here. I want some of his CF goodies myself.jason knowlton said:Ya i've been trying to PM him but his message box is full, i would like to see if he would be interested in doing a couple srx windshields
jason knowlton
New member
He had some stuff on here for sale, some gears I think but his pm box is full. Not sure if there is any other way to get in touch with him or not.
03viperguy
Moderator
he was logged in yesterday, I say keep trying and see if you can get ahold of him. does have some nice looking goodies
jason knowlton
New member
Yes he does have alot of nice stuff

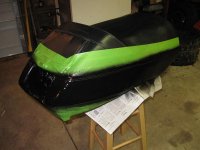
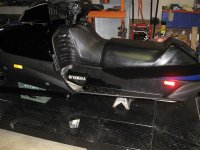
Got the seat done for the sled, took a 03 viper seat and wiped it down with prep sol first to remove any old armor all or wax, and then final wipe with laq. thinner. Applied 2 coats of the black mar hyde dye, wow, that  stuff stinks!!
kinda looks like a ditch pickle cat seat with the green tape on it....lol

I left a little pecie of blue on the bottom as its the same shape as the blue is on the hood so it might tie the 2 ends of the sled together, will have to see how it looks on a final side view when i get the skid put back under it and outside.
I think the sled still looks fairly sinister/vaderish as it sits.
stuff stinks!!kinda looks like a ditch pickle cat seat with the green tape on it....lol
I left a little pecie of blue on the bottom as its the same shape as the blue is on the hood so it might tie the 2 ends of the sled together, will have to see how it looks on a final side view when i get the skid put back under it and outside.
I think the sled still looks fairly sinister/vaderish as it sits.
Attachments

jason knowlton
New member
Looking good< that blue stripe on the seat don't look to bad
03viperguy
Moderator
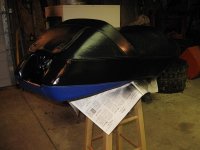
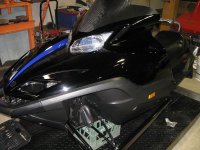
coming along nice. need an outdoor pic, the flash makes the bellypan look a lot less black then the fresh dyed seat and fresh painted hood. looking sharp though!
03viperguy said:coming along nice. need an outdoor pic, the flash makes the bellypan look a lot less black then the fresh dyed seat and fresh painted hood. looking sharp though!
ya, same problem as last time the black kinda eats up the flash on the painted parts and other peices(plastic) make more of a flash color off them.
In person... vader is everything about BLACK........................

When it gets outside... it will all come together!

Thanx for the compliments guys!

03viperguy
Moderator
yeah, I figured thats what was happening!
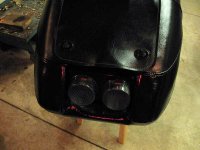
Don need to spray the reflectors with that tail light spray tint. Transparent black in a can.
amatosrx said:Don need to spray the reflectors with that tail light spray tint. Transparent black in a can.
I am right with ya Pete, but instead of the spray, I bought a transparent smoke headlight film on evil bay, gonna do the headlight and the reflectors with it. I have headlight covers but dont want to be bothered with taking them off all the time and then they get scratched up in the trunk, so trying to eliminate that bit. Still want to tame down the shine on the headlights and reflectors, but have them usefull yet.
they do for sure stick out like a sore thumb on it.

03viperguy
Moderator
on the scratching the cover bit, I used a towel and sewed it over itself twice, making 2 pockets. they would slide right in and stay scratch free. but, your idea sounds easier, as long as the lights are still bright enough to work well at night. should really look MEAN when you are all done!
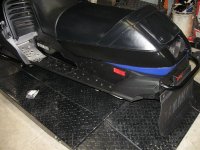
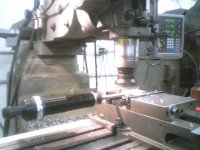
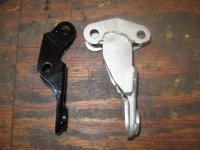
trimmed the shock mounts so they would fit into the trailing arms, everything went smooth and no issues, had to trim the sleeve, then push the bushings in further to leave the aluminum, flat cut that on the mill.
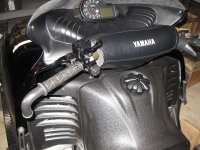
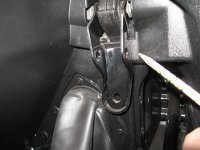
They bolt right on now using the sx shock adaptors, you have to trim a small peice of bellypan for them to sit flush against the frame, pointing to it with pencil in pic. You also have to drill and tap a hole in the side for the lower part of the bracket.
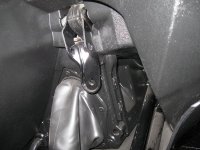
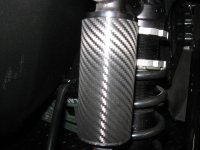
The lower clicker knob is very easy to get at under the the mount, its up high enough nothing should hit it either, the ski will pretty much protect it from the ground. Amatosrx(Pete) sent me some trick carbon fiber material and i covered the cans of the shocks with it. Thanx Pete, they look great!
((try not to notice how dusty old darth got over summer... ))
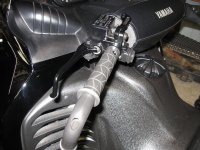
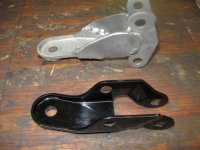
ADD: Heres the shock brackets modified, I had to cut them apart and make new sides, weld them up and they fit perfect. Now the shock adjusting knob wont interfere with the bellypan and the shock angle is not so drastic.
They bolt right on now using the sx shock adaptors, you have to trim a small peice of bellypan for them to sit flush against the frame, pointing to it with pencil in pic. You also have to drill and tap a hole in the side for the lower part of the bracket.
The lower clicker knob is very easy to get at under the the mount, its up high enough nothing should hit it either, the ski will pretty much protect it from the ground. Amatosrx(Pete) sent me some trick carbon fiber material and i covered the cans of the shocks with it. Thanx Pete, they look great!
((try not to notice how dusty old darth got over summer...
))ADD: Heres the shock brackets modified, I had to cut them apart and make new sides, weld them up and they fit perfect. Now the shock adjusting knob wont interfere with the bellypan and the shock angle is not so drastic.
Attachments

Last edited:
I like don it looks sweet.
super1c
Super Moderator
Wow don, very cool. Puts my vipers to shame! LOL! I really like the shocks and the carbon fiber canisters.
03viperguy
Moderator
that thing will be a beast when its all done!
yami1
Member
Let us know how those shocks work out. Did you need to lenghthen ur radius rods??? What are those out of??
yami1 said:Let us know how those shocks work out. Did you need to lenghthen ur radius rods??? What are those out of??
No, I didnt change the radius rods, they are the stock viper rods. I think the shocks came from a apex model, bought them off the 4 stroke classified section.
Took some pointers from snoprokid on here as he seems to have the know how to put all differnt shocks on the front of these vipers. I modded the shock brackets so that I could move the top mount up and out slightly from the sx bracket. As the top clicker knob would hit the belly pan if it was kept the same as the stock viper. The sx bracket alone dropped the top mounting point by about 2 inchs so it makes your steering tubes bottom out on the bulkhead and the swaybar links too long which binds those as well. I may still also have to make little tubing spacers like snoprokid did to raise my outer tie rod ends up slightly to keep from having them bind on the steering arm, this will also reduce the angle of them with the long shocks, make it steer easy......

I will post a couple pics of the modded brackets and now eveything seems to fit much better
, no chance of damaging the shocks from jumping .